
Documentation Index

Fetch the complete documentation index at: https://guide.daro.so/llms.txt

Use this file to discover all available pages before exploring further.

Native Ad Format

Native ads provide individual ad components that you implement directly in your app’s layout, unlike other formats where the SDK provides the complete ad view. Advantages: Customize the layout to match your UI/UX and minimize visual disruption. Requirements: Include an ad indicator and maintain visual differentiation to prevent users from confusing ads with content. Native Example Elements En Pn
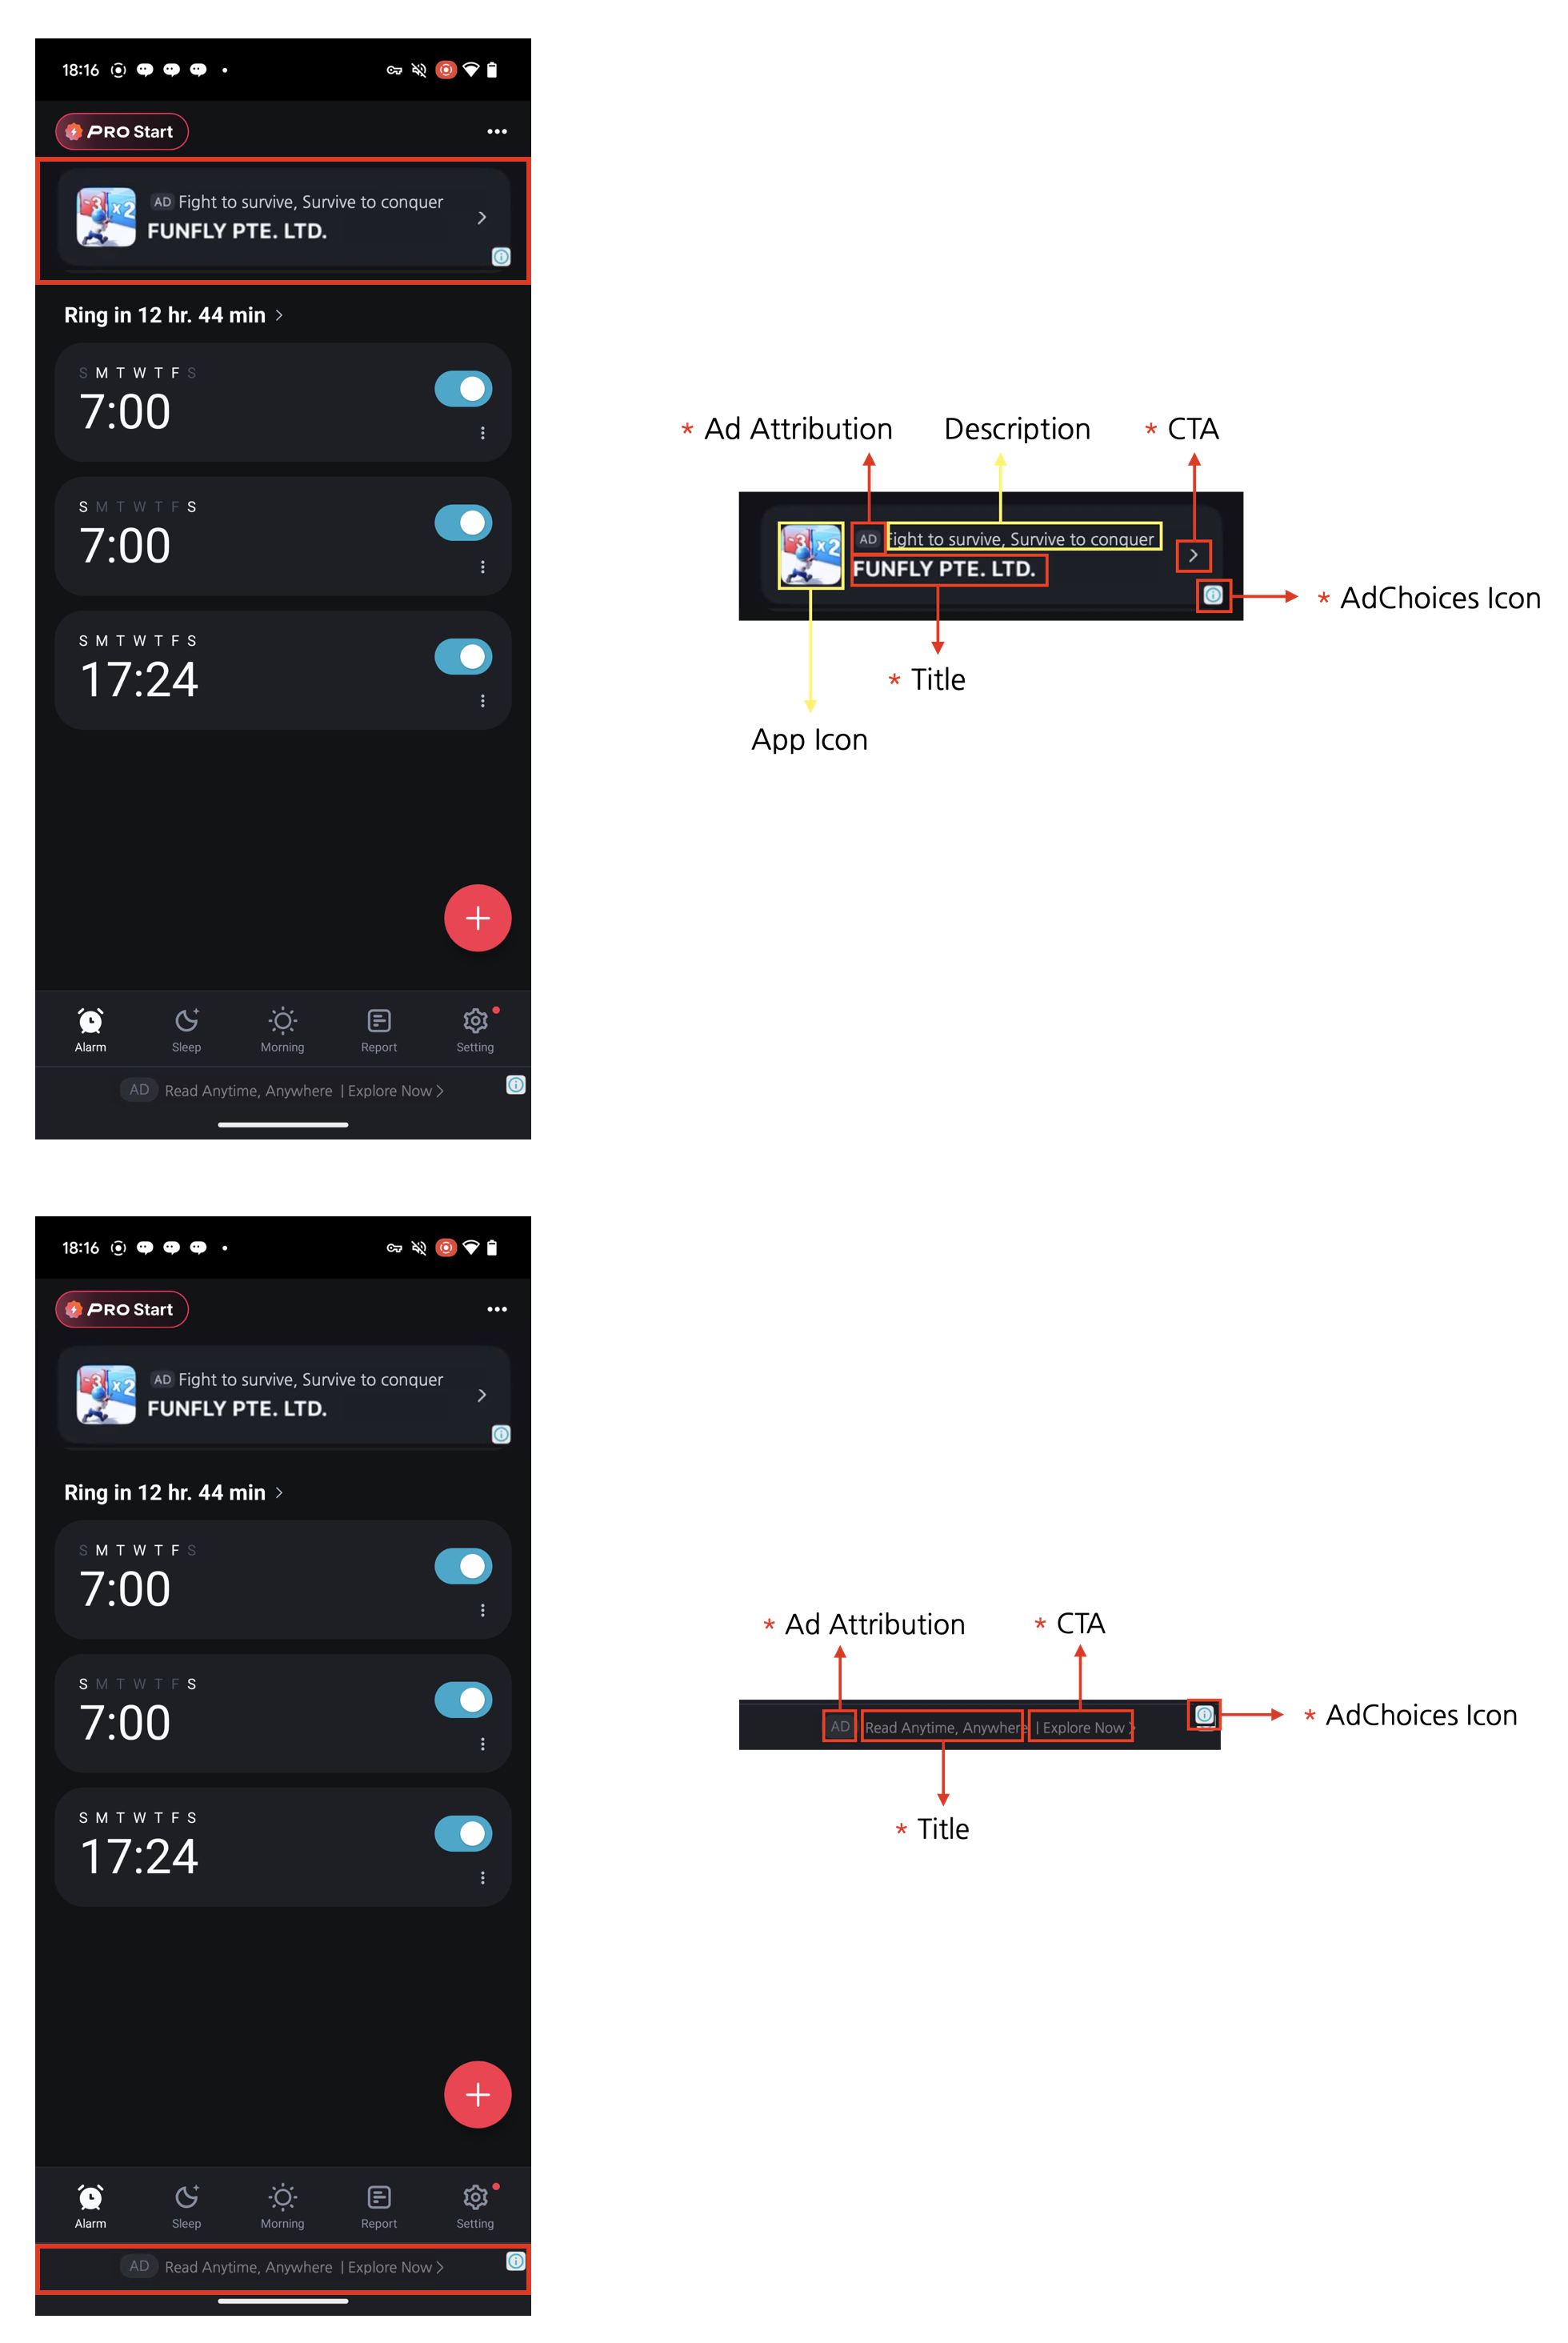
Four Required Elements for Native AdsNative ads can be designed to complement the content and look of your app. However, the following four required elements must be included. These elements are necessary to clearly mark native ads as advertisements so that users don’t mistake them for content, and to ensure the minimum advertising effectiveness expected by advertisers.
  1. Ad attribution: You must clearly display ad attribution text such as “Ad”, “Advertisement”, or “Sponsored” (localized appropriately) in the ad area so users can clearly identify the content as advertising.
  2. AdChoices icon: The AdChoices overlay icon enables users to identify and control ads, typically displayed as an ’ⓘ’ icon. This icon is automatically added by the DARO SDK, so no separate implementation is required. It is placed in one of the four corners of the ad view (top-left, top-right, bottom-right, bottom-left), with bottom-right as the default. You can pick the corner via the preferredAdChoicesPosition option (see the AdChoices placement section below). Please lay out your ad view so the selected corner is not overlapped or obscured by other UI elements. The icon’s appearance and behavior may vary depending on the ad source (demand).
  3. Title: The ad title must be displayed.
  4. CTA (Call to action): A CTA button with text such as “Install”, “Open”, or “Download” must be included. The size and format of the button can be freely configured, and it can be replaced with a text field depending on the situation. Since the ad source (demand) provides the CTA text, there is no need to specify fixed wording.

Ad Unit Setup

Configure your ad unit using the ad unit ID issued from the dashboard.
let adUnit = DaroAdUnit(unitId: "your_native_unit_id")

Native Ad Implementation

Basic Implementation

In Swift, implement a custom view by subclassing DaroAdNativeView.
final class DaroLargeNativeAdContentView: DaroAdNativeView {
override init(unit: DaroAdUnit) {
    super.init(unit: unit)
    layout()
}

@available(*, unavailable)
public required init?(coder: NSCoder) {
    fatalError("init(coder:) has not been implemented")
}

var containerView = UIView()

var iconImageView: UIImageView = {
    let view = UIImageView()
    view.contentMode = .scaleAspectFill
    view.layer.cornerRadius = 4
    view.clipsToBounds = true
    view.isHidden = false
    return view
}()

var titleLabel: UILabel = {
    let label = UILabel()
    label.isUserInteractionEnabled = false
    label.clipsToBounds = true
    label.font = .systemFont(ofSize: 15, weight: .bold)
    label.textColor = UIColor.white
    label.numberOfLines = 2
    return label
}()

var advertiserLabel: UILabel = {
    let label = UILabel()
    label.isUserInteractionEnabled = false
    label.clipsToBounds = true
    label.font = .systemFont(ofSize: 12, weight: .regular)
    label.numberOfLines = 2
    label.textColor = UIColor.white
    return label
}()

/// Media View
let mediaContentView: UIView = UIView()

/// Call to Action
var callToActionButton: UIButton = {
    let button = UIButton()
    button.translatesAutoresizingMaskIntoConstraints = false
    button.clipsToBounds = true
    button.titleLabel?.font = .systemFont(ofSize: 20, weight: .bold)
    button.setTitleColor(.label, for: .normal)
    button.backgroundColor = UIColor.systemGray3
    button.layer.cornerRadius = 4
    return button
}()

/// Body
var bodyLabel: UILabel = {
    let label = UILabel()
    label.isUserInteractionEnabled = false
    label.clipsToBounds = true
    label.font = .systemFont(ofSize: 15, weight: .regular)
    label.numberOfLines = 2
    label.textColor = UIColor.white
    return label
}()

private func layout() {
    translatesAutoresizingMaskIntoConstraints = false
    let blurEffect = UIBlurEffect(style: .systemMaterialDark)
    let blurView = UIVisualEffectView(effect: blurEffect)
    blurView.translatesAutoresizingMaskIntoConstraints = false
    blurView.isUserInteractionEnabled = false
    containerView.addSubview(blurView)
    NSLayoutConstraint.activate([
        blurView.leadingAnchor.constraint(equalTo: containerView.leadingAnchor),
        blurView.trailingAnchor.constraint(equalTo: containerView.trailingAnchor),
        blurView.topAnchor.constraint(equalTo: containerView.topAnchor),
        blurView.bottomAnchor.constraint(equalTo: containerView.bottomAnchor),
    ])
    containerView.clipsToBounds = true

    addSubview(containerView)
    containerView.translatesAutoresizingMaskIntoConstraints = false
    NSLayoutConstraint.activate([
        containerView.leadingAnchor.constraint(equalTo: leadingAnchor),
        containerView.trailingAnchor.constraint(equalTo: trailingAnchor),
        containerView.topAnchor.constraint(equalTo: topAnchor),
        containerView.bottomAnchor.constraint(equalTo: bottomAnchor),
    ])

    [
        mediaContentView,
        iconImageView,
        titleLabel,
        advertiserLabel,
        bodyLabel,
        callToActionButton,
    ]
    .forEach {
        containerView.addSubview($0)
        $0.translatesAutoresizingMaskIntoConstraints = false
    }

    activateLayout()
}

func activateLayout() {
    NSLayoutConstraint.activate([
        iconImageView.topAnchor.constraint(equalTo: containerView.topAnchor, constant: 10),
        iconImageView.leftAnchor.constraint(equalTo: containerView.leftAnchor, constant: 10),
        iconImageView.heightAnchor.constraint(equalToConstant: 70),
        iconImageView.widthAnchor.constraint(equalToConstant: 70),

        titleLabel.topAnchor.constraint(equalTo: iconImageView.topAnchor),
        titleLabel.leftAnchor.constraint(equalTo: iconImageView.rightAnchor, constant: 10),
        titleLabel.rightAnchor.constraint(equalTo: containerView.rightAnchor, constant: -10),

        advertiserLabel.bottomAnchor.constraint(equalTo: iconImageView.bottomAnchor),
        advertiserLabel.leftAnchor.constraint(equalTo: iconImageView.rightAnchor, constant: 10),

        bodyLabel.topAnchor.constraint(equalTo: iconImageView.bottomAnchor, constant: 10),
        bodyLabel.leftAnchor.constraint(equalTo: containerView.leftAnchor, constant: 10),
        bodyLabel.rightAnchor.constraint(equalTo: containerView.rightAnchor, constant: -10),

        mediaContentView.topAnchor.constraint(equalTo: bodyLabel.bottomAnchor, constant: 10),
        mediaContentView.widthAnchor.constraint(equalTo: containerView.widthAnchor),
        mediaContentView.heightAnchor.constraint(equalTo: containerView.widthAnchor),
        mediaContentView.centerYAnchor.constraint(equalTo: containerView.centerYAnchor),
        mediaContentView.centerXAnchor.constraint(equalTo: containerView.centerXAnchor),

        callToActionButton.topAnchor.constraint(equalTo: mediaContentView.bottomAnchor, constant: 10),
        callToActionButton.bottomAnchor.constraint(equalTo: containerView.bottomAnchor, constant: -10),
        callToActionButton.leftAnchor.constraint(equalTo: containerView.leftAnchor, constant: 20),
        callToActionButton.rightAnchor.constraint(equalTo: containerView.rightAnchor, constant: -20),
    ])

    bindViews(
        titleLabel: titleLabel,
        advertiserLabel: advertiserLabel,
        bodyLabel: bodyLabel,
        iconImageView: iconImageView,
        mediaContentView: mediaContentView,
        callToActionButton: callToActionButton
    )
}
}

Native Ad Usage Example

This is an example of using native ads.

Basic Usage

class ExampleViewController: UIViewController {
    private var nativeAdView: DaroLargeNativeAdContentView?

    override func viewDidLoad() {
        super.viewDidLoad()
        setupNativeAd()
    }

    private func setupNativeAd() {
        let adUnit = DaroAdUnit(unitId: "your_native_unit_id")
        nativeAdView = DaroLargeNativeAdContentView(unit: adUnit)

        guard let nativeAdView = nativeAdView else { return }

        nativeAdView.translatesAutoresizingMaskIntoConstraints = false
        view.addSubview(nativeAdView)

        NSLayoutConstraint.activate([
            nativeAdView.centerXAnchor.constraint(equalTo: view.centerXAnchor),
            nativeAdView.widthAnchor.constraint(equalToConstant: 300),
            nativeAdView.heightAnchor.constraint(equalToConstant: 500),
            nativeAdView.topAnchor.constraint(equalTo: view.safeAreaLayoutGuide.topAnchor, constant: 20)
        ])

        nativeAdView.listener.onAdClicked = { adInfo in
            print("[DARO] Listener Native Ad clicked: \(adInfo)")
        }
        nativeAdView.listener.onAdImpression = { adInfo in
            print("[DARO] Listener Native Ad impression: \(adInfo)")
        }
        nativeAdView.listener.onAdLoadSuccess = { ad, adInfo in
            print("[DARO] Listener Native Ad loaded: \(ad) \(adInfo)")
        }
        nativeAdView.listener.onAdLoadFail = { error in
            print("[DARO] Listener Native Ad failed: \(error)")
        }

        nativeAdView.loadAd()
    }
}
Note: Native ads automatically load the initial ad upon creation.

Manual Initial Load Setup

You can use the autoLoad parameter to directly control the initial load timing of the ad.
// Native ad - manual initial load mode
let nativeAdView = DaroLargeNativeAdContentView(
    unit: adUnit,
    autoLoad: false  // Disable automatic initial load
)

// Load initial ad at desired time
nativeAdView.loadAd()
autoLoad Parameter
  • true (default): Automatically loads initial ad when view is created
  • false: Initial ad loads when loadAd() is manually called
Manual initial load is useful in the following cases:
  • When you want to display the ad after a specific user action
  • When you want to control ad load timing during screen transitions
  • When you want to load the ad after checking network status
Note: Ad refresh after loading is automatically managed by the SDK.

AdChoices placement

Use the preferredAdChoicesPosition option to control which corner the AdChoices icon is rendered in within the ad view. If unset, it defaults to the bottom-right corner (.bottomRight). On iOS, this option is supported equally on both the Daro and DaroM SDKs, and applies to every native ad view (DaroLargeNativeAdContentView, DaroAdLineBannerView, and others). Supported values: topLeft, topRight, bottomLeft, bottomRight.

DaroAdChoicesPosition

@objc public enum DaroAdChoicesPosition: Int {
    case topLeft
    case topRight
    case bottomRight  // default
    case bottomLeft
}
  • Objective-C compatible @objc enum — the same type is used from both Swift and Objective-C.
  • If not specified, .bottomRight (DaroAdChoicesPositionBottomRight in Objective-C) is used as the default.
let adUnit = DaroAdUnit(unitId: "your_native_unit_id")

// Display the AdChoices icon at the top-left
let nativeAdView = DaroLargeNativeAdContentView(
    unit: adUnit,
    preferredAdChoicesPosition: .topLeft
)
Other native views such as DaroAdLineBannerView also support the same preferredAdChoicesPosition parameter.
Fixed at initializationpreferredAdChoicesPosition is fixed at ad view initialization and cannot be changed afterwards. To use a different position, create a new view instance.
Behavior varies by demand source (preferred, not guaranteed)preferredAdChoicesPosition asks the demand source to place the AdChoices icon at the specified position. However, where it actually appears is decided by each demand source, so the requested position is not always honored.Demand sources may respond differently:
  • Some demand sources honor the requested position as-is.
  • Some demand sources ignore the request and use their own fixed position.
  • Some demand sources replace the AdChoices icon with their own ad indicator (such as an ad badge).
In every case, the relevant ad compliance requirements are satisfied.Therefore, when designing your ad layout, assume the AdChoices icon or ad badge can appear in any of the four corners and reserve sufficient padding around each corner.

Native Templates

DARO SDK provides basic native ad templates. This allows you to easily implement native ads without implementing custom views.

Line Banner Template

DaroAdLineBannerView is a horizontal native ad template. It has the following features:
  • Basic layout including icon, title, and advertiser information
  • Ad mark display
Line banner template ad example
class ExampleViewController: UIViewController {
    private var lineBannerView: DaroAdLineBannerView?

    override func viewDidLoad() {
        super.viewDidLoad()
        setupLineBannerAd()
    }

    private func setupLineBannerAd() {
        let adUnit = DaroAdUnit(unitId: "your_native_unit_id")
        lineBannerView = DaroAdLineBannerView(unit: adUnit)

        guard let lineBannerView = lineBannerView else { return }

        lineBannerView.translatesAutoresizingMaskIntoConstraints = false
        view.addSubview(lineBannerView)

        NSLayoutConstraint.activate([
            lineBannerView.leadingAnchor.constraint(equalTo: view.leadingAnchor),
            lineBannerView.trailingAnchor.constraint(equalTo: view.trailingAnchor),
            lineBannerView.heightAnchor.constraint(equalToConstant: 36),
            lineBannerView.bottomAnchor.constraint(equalTo: view.safeAreaLayoutGuide.bottomAnchor)
        ])

        lineBannerView.listener.onAdClicked = { adInfo in
            print("[DARO] Listener Line Banner Ad clicked: \(adInfo)")
        }
        lineBannerView.listener.onAdImpression = { adInfo in
            print("[DARO] Listener Line Banner Ad impression: \(adInfo)")
        }
        lineBannerView.listener.onAdLoadSuccess = { ad, adInfo in
            print("[DARO] Listener Line Banner Ad loaded: \(ad) \(adInfo)")
        }
        lineBannerView.listener.onAdLoadFail = { error in
            print("[DARO] Listener Line Banner Ad failed: \(error)")
        }

        lineBannerView.loadAd()
    }
}
Note: Line banner template also automatically loads the initial ad upon creation.

Alignment Options

You can set the content alignment of the line banner using the alignment parameter.
OptionDescription
.leftLeft-aligned
.center (default)Center-aligned
.rightRight-aligned
Line banner left alignment example
// Left alignment
let lineBannerView = DaroAdLineBannerView(
    unit: adUnit,
    alignment: .left
)

// Center alignment (default)
let lineBannerView = DaroAdLineBannerView(
    unit: adUnit,
    alignment: .center
)

// Right alignment
let lineBannerView = DaroAdLineBannerView(
    unit: adUnit,
    alignment: .right
)

Manual Initial Load Setup

Line banner template also supports the autoLoad parameter:
// Line banner - manual initial load mode
let lineBannerView = DaroAdLineBannerView(
    unit: adUnit,
    autoLoad: false  // Disable automatic initial load
)

// Load initial ad at desired time
lineBannerView.loadAd()
Using the template eliminates the need to implement ad view layout directly, allowing you to use the default layout provided by the SDK. If needed, you can customize the template style.

Template Configuration

You can customize the template style through DaroLineNativeAdConfiguration
let configuration = DaroLineNativeAdConfiguration()
configuration.backgroundColor = // Background color
configuration.adMarkTextColor = // Ad mark text color
configuration.adMarkBackgroundColor = // Ad mark background color
configuration.titleTextColor = // Title text color
configuration.ctaTextColor = // CTA button text color
configuration.ctaBackgroundColor = // CTA button background color

lineBannerView.configuration = configuration