> ## Documentation Index
> Fetch the complete documentation index at: https://guide.daro.so/llms.txt
> Use this file to discover all available pages before exploring further.
# 네이티브 광고
> DARO를 통해 네이티브 광고를 구현하는 방법을 알아봅니다.
## 네이티브 광고 형태 소개
* 광고 뷰를 SDK가 자체적으로 구현해주는 타 광고 형태와 달리 네이티브 광고 형태는 구성 요소들을 전달받아 앱에서 직접 광고 뷰를 구현합니다.
* UI/UX 기반으로 레이아웃을 직접 구현하므로써 위화감을 적게 만들 수 있다는 것이 가장 큰 특징입니다. 단, 유저가 광고가 아닌 컨텐츠로써 착각하는 경우를 방지하기 위해 광고 표시와 함께 최소한의 차별성은 부여해야합니다.
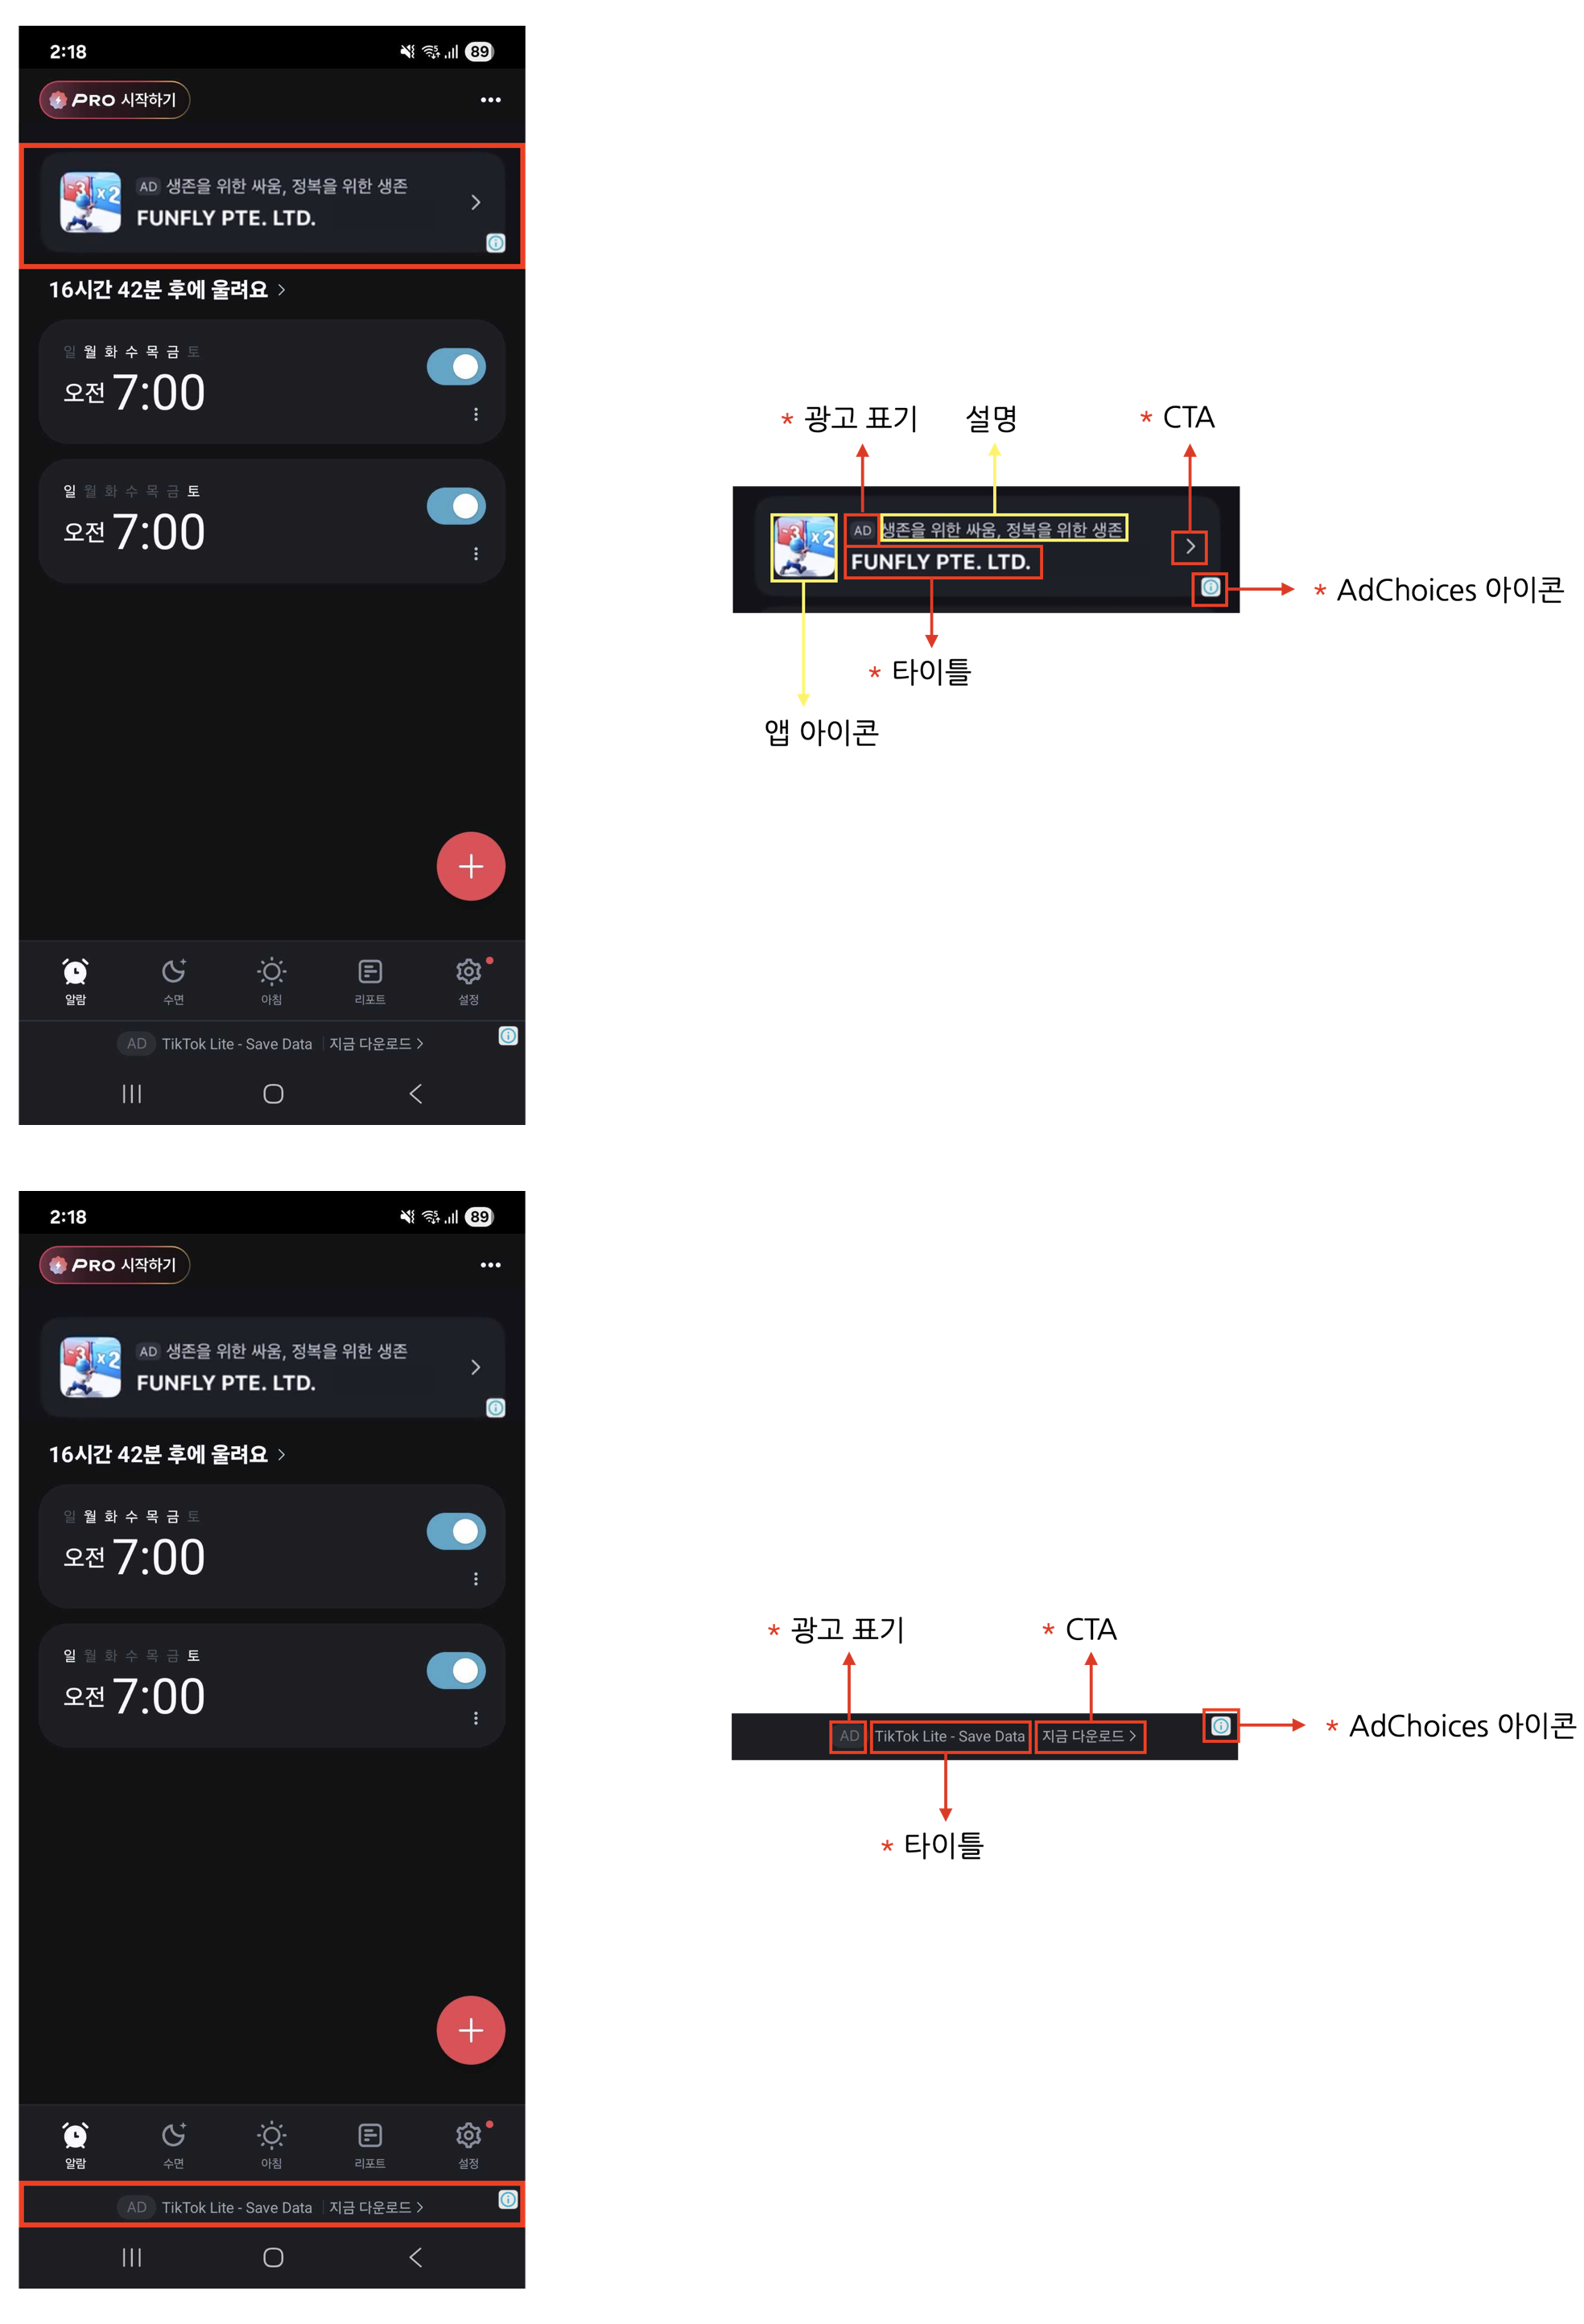 **네이티브 광고 필수 요소 4가지**
네이티브 광고는 앱 UI에 맞게 자유롭게 디자인할 수 있지만, 아래의 **4가지 필수 요소는 반드시 포함**해야 합니다. 이는 사용자가 광고임을 명확히 인지하도록 하고, 광고주가 기대하는 최소한의 광고 효과를 보장하기 위한 광고 정책입니다.
1. 광고 표기 : 사용자가 광고임을 명확히 인지할 수 있도록 광고 영역에 "AD", "광고" 등의 표기를 추가해 주세요.
2. AdChoices 아이콘 : AdChoices 아이콘은 사용자가 광고를 식별하고 제어할 수 있도록 제공되는 아이콘으로, 일반적으로 'ⓘ' 모양으로 표시됩니다. 해당 아이콘은 DARO SDK에서 자동으로 삽입되므로 별도 구현은 필요하지 않습니다. 광고 뷰의 4개 모서리(좌상단/우상단/우하단/좌하단) 중 한 곳에 배치되며, 기본 위치는 우하단입니다. `preferredAdChoicesPosition` 옵션으로 원하는 모서리를 선택할 수 있으니 (자세한 내용은 아래 [AdChoice 표시 위치](#adchoice-표시-위치) 섹션 참고), 해당 위치가 다른 UI 요소와 겹치거나 가려지지 않도록 광고 뷰를 구성해 주세요. 광고 소스(디맨드)에 따라 아이콘의 형태나 동작이 다를 수 있습니다.
3. 광고 제목 (타이틀) : 광고의 제목을 표시해야 합니다.
4. 클릭 유도 문안(CTA) : "설치", "열기", "다운로드" 등의 CTA(Call to Action) 버튼을 반드시 포함해 주세요. 버튼의 크기나 형태는 자유롭게 구성할 수 있으며, 상황에 따라 텍스트 필드로 대체 가능합니다. 광고 소스(디맨드)에서 CTA 문구를 제공하므로, 특정 문구를 고정할 필요는 없습니다.
***
## 광고 단위 설정
대시보드에서 발급받은 `ad unit ID`를 사용하여 광고 단위를 설정하세요.
```swift theme={null}
let adUnit = DaroAdUnit(unitId: "your_native_unit_id")
```
```objc theme={null}
// Objective-C에서는 DaroAdUnit을 별도로 생성하지 않고
// 초기화 시 unitId를 직접 전달합니다
NSString *nativeUnitId = @"your_native_unit_id";
```
## 네이티브 광고 구현
### 기본 구현
Swift에서는 `DaroAdNativeView`를 상속하여 커스텀 뷰를 구현합니다.
```swift theme={null}
final class DaroLargeNativeAdContentView: DaroAdNativeView {
override init(unit: DaroAdUnit) {
super.init(unit: unit)
layout()
}
@available(*, unavailable)
public required init?(coder: NSCoder) {
fatalError("init(coder:) has not been implemented")
}
var containerView = UIView()
var iconImageView: UIImageView = {
let view = UIImageView()
view.contentMode = .scaleAspectFill
view.layer.cornerRadius = 4
view.clipsToBounds = true
view.isHidden = false
return view
}()
var titleLabel: UILabel = {
let label = UILabel()
label.isUserInteractionEnabled = false
label.clipsToBounds = true
label.font = .systemFont(ofSize: 15, weight: .bold)
label.textColor = UIColor.white
label.numberOfLines = 2
return label
}()
var advertiserLabel: UILabel = {
let label = UILabel()
label.isUserInteractionEnabled = false
label.clipsToBounds = true
label.font = .systemFont(ofSize: 12, weight: .regular)
label.numberOfLines = 2
label.textColor = UIColor.white
return label
}()
/// Media View
let mediaContentView: UIView = UIView()
/// Call to Action
var callToActionButton: UIButton = {
let button = UIButton()
button.translatesAutoresizingMaskIntoConstraints = false
button.clipsToBounds = true
button.titleLabel?.font = .systemFont(ofSize: 20, weight: .bold)
button.setTitleColor(.label, for: .normal)
button.backgroundColor = UIColor.systemGray3
button.layer.cornerRadius = 4
return button
}()
/// Body
var bodyLabel: UILabel = {
let label = UILabel()
label.isUserInteractionEnabled = false
label.clipsToBounds = true
label.font = .systemFont(ofSize: 15, weight: .regular)
label.numberOfLines = 2
label.textColor = UIColor.white
return label
}()
private func layout() {
translatesAutoresizingMaskIntoConstraints = false
let blurEffect = UIBlurEffect(style: .systemMaterialDark)
let blurView = UIVisualEffectView(effect: blurEffect)
blurView.translatesAutoresizingMaskIntoConstraints = false
blurView.isUserInteractionEnabled = false
containerView.addSubview(blurView)
NSLayoutConstraint.activate([
blurView.leadingAnchor.constraint(equalTo: containerView.leadingAnchor),
blurView.trailingAnchor.constraint(equalTo: containerView.trailingAnchor),
blurView.topAnchor.constraint(equalTo: containerView.topAnchor),
blurView.bottomAnchor.constraint(equalTo: containerView.bottomAnchor),
])
containerView.clipsToBounds = true
addSubview(containerView)
containerView.translatesAutoresizingMaskIntoConstraints = false
NSLayoutConstraint.activate([
containerView.leadingAnchor.constraint(equalTo: leadingAnchor),
containerView.trailingAnchor.constraint(equalTo: trailingAnchor),
containerView.topAnchor.constraint(equalTo: topAnchor),
containerView.bottomAnchor.constraint(equalTo: bottomAnchor),
])
[
mediaContentView,
iconImageView,
titleLabel,
advertiserLabel,
bodyLabel,
callToActionButton,
]
.forEach {
containerView.addSubview($0)
$0.translatesAutoresizingMaskIntoConstraints = false
}
activateLayout()
}
func activateLayout() {
NSLayoutConstraint.activate([
iconImageView.topAnchor.constraint(equalTo: containerView.topAnchor, constant: 10),
iconImageView.leftAnchor.constraint(equalTo: containerView.leftAnchor, constant: 10),
iconImageView.heightAnchor.constraint(equalToConstant: 70),
iconImageView.widthAnchor.constraint(equalToConstant: 70),
titleLabel.topAnchor.constraint(equalTo: iconImageView.topAnchor),
titleLabel.leftAnchor.constraint(equalTo: iconImageView.rightAnchor, constant: 10),
titleLabel.rightAnchor.constraint(equalTo: containerView.rightAnchor, constant: -10),
advertiserLabel.bottomAnchor.constraint(equalTo: iconImageView.bottomAnchor),
advertiserLabel.leftAnchor.constraint(equalTo: iconImageView.rightAnchor, constant: 10),
bodyLabel.topAnchor.constraint(equalTo: iconImageView.bottomAnchor, constant: 10),
bodyLabel.leftAnchor.constraint(equalTo: containerView.leftAnchor, constant: 10),
bodyLabel.rightAnchor.constraint(equalTo: containerView.rightAnchor, constant: -10),
mediaContentView.topAnchor.constraint(equalTo: bodyLabel.bottomAnchor, constant: 10),
mediaContentView.widthAnchor.constraint(equalTo: containerView.widthAnchor),
mediaContentView.heightAnchor.constraint(equalTo: containerView.widthAnchor),
mediaContentView.centerYAnchor.constraint(equalTo: containerView.centerYAnchor),
mediaContentView.centerXAnchor.constraint(equalTo: containerView.centerXAnchor),
callToActionButton.topAnchor.constraint(equalTo: mediaContentView.bottomAnchor, constant: 10),
callToActionButton.bottomAnchor.constraint(equalTo: containerView.bottomAnchor, constant: -10),
callToActionButton.leftAnchor.constraint(equalTo: containerView.leftAnchor, constant: 20),
callToActionButton.rightAnchor.constraint(equalTo: containerView.rightAnchor, constant: -20),
])
bindViews(
titleLabel: titleLabel,
advertiserLabel: advertiserLabel,
bodyLabel: bodyLabel,
iconImageView: iconImageView,
mediaContentView: mediaContentView,
callToActionButton: callToActionButton
)
}
}
```
Objective-C에서는 `UIView`를 상속하고 내부에 `DaroObjCNativeView`를 포함하는 커스텀 뷰를 구현합니다.
**중요: 뷰 계층 구조**
Objective-C에서 네이티브 광고를 구현할 때는 **모든 UI 컴포넌트를 반드시 `nativeAdView`에 추가**해야 합니다.
`self`가 아닌 `_nativeAdView`에 `addSubview`를 호출하는 것에 주의하세요.
```objc theme={null}
// ❌ 잘못된 예시
[self addSubview:_titleLabel];
// ✅ 올바른 예시
[_nativeAdView addSubview:_titleLabel];
```
**헤더 파일 (CustomDaroNativeView\.h):**
```objc theme={null}
#import
@class DaroObjCNativeView;
@protocol DaroObjCNativeViewDelegate;
@interface CustomDaroNativeView : UIView
@property (nonatomic, strong, readonly) UIImageView *iconImageView;
@property (nonatomic, strong, readonly) UILabel *titleLabel;
@property (nonatomic, strong, readonly) UILabel *advertiserLabel;
@property (nonatomic, strong, readonly) UILabel *bodyLabel;
@property (nonatomic, strong, readonly) UIView *mediaContentView;
@property (nonatomic, strong, readonly) UIButton *callToActionButton;
@property (nonatomic, strong, readonly) DaroObjCNativeView *nativeAdView;
@property (nonatomic, weak, nullable) id delegate;
- (instancetype)initWithUnitId:(NSString *)unitId;
- (instancetype)initWithUnitId:(NSString *)unitId autoLoad:(BOOL)autoLoad;
- (void)loadNativeAd;
@end
```
**구현 파일 (CustomDaroNativeView\.m):**
```objc theme={null}
#import "CustomDaroNativeView.h"
#import
@interface CustomDaroNativeView ()
@property (nonatomic, strong, readwrite) UIImageView *iconImageView;
@property (nonatomic, strong, readwrite) UILabel *titleLabel;
@property (nonatomic, strong, readwrite) UILabel *advertiserLabel;
@property (nonatomic, strong, readwrite) UILabel *bodyLabel;
@property (nonatomic, strong, readwrite) UIView *mediaContentView;
@property (nonatomic, strong, readwrite) UIButton *callToActionButton;
@property (nonatomic, strong, readwrite) DaroObjCNativeView *nativeAdView;
@end
@implementation CustomDaroNativeView
- (instancetype)initWithUnitId:(NSString *)unitId {
return [self initWithUnitId:unitId autoLoad:NO];
}
- (instancetype)initWithUnitId:(NSString *)unitId autoLoad:(BOOL)autoLoad {
self = [super initWithFrame:CGRectZero];
if (self) {
// DaroObjCNativeView 생성
_nativeAdView = [[DaroObjCNativeView alloc] initWithUnitId:unitId autoLoad:NO];
[self setupCustomLayout];
}
return self;
}
- (void)setupCustomLayout {
// Step 1: nativeAdView를 self에 추가
_nativeAdView.translatesAutoresizingMaskIntoConstraints = NO;
[self addSubview:_nativeAdView];
// Step 2: UI 컴포넌트 생성
_iconImageView = [[UIImageView alloc] init];
_iconImageView.contentMode = UIViewContentModeScaleAspectFill;
_iconImageView.layer.cornerRadius = 8;
_iconImageView.clipsToBounds = YES;
_iconImageView.translatesAutoresizingMaskIntoConstraints = NO;
_titleLabel = [[UILabel alloc] init];
_titleLabel.font = [UIFont boldSystemFontOfSize:17];
_titleLabel.numberOfLines = 2;
_titleLabel.translatesAutoresizingMaskIntoConstraints = NO;
_advertiserLabel = [[UILabel alloc] init];
_advertiserLabel.font = [UIFont systemFontOfSize:13];
_advertiserLabel.textColor = [UIColor secondaryLabelColor];
_advertiserLabel.numberOfLines = 1;
_advertiserLabel.translatesAutoresizingMaskIntoConstraints = NO;
_bodyLabel = [[UILabel alloc] init];
_bodyLabel.font = [UIFont systemFontOfSize:14];
_bodyLabel.numberOfLines = 3;
_bodyLabel.translatesAutoresizingMaskIntoConstraints = NO;
_mediaContentView = [[UIView alloc] init];
_mediaContentView.backgroundColor = [UIColor systemGray5Color];
_mediaContentView.layer.cornerRadius = 8;
_mediaContentView.clipsToBounds = YES;
_mediaContentView.translatesAutoresizingMaskIntoConstraints = NO;
_callToActionButton = [UIButton buttonWithType:UIButtonTypeSystem];
_callToActionButton.titleLabel.font = [UIFont boldSystemFontOfSize:16];
_callToActionButton.backgroundColor = [UIColor systemBlueColor];
[_callToActionButton setTitleColor:[UIColor whiteColor] forState:UIControlStateNormal];
_callToActionButton.layer.cornerRadius = 8;
_callToActionButton.translatesAutoresizingMaskIntoConstraints = NO;
// Step 3: ⚠️ 중요 - UI 컴포넌트를 nativeAdView에 추가
// self가 아닌 _nativeAdView에 추가해야 합니다!
[_nativeAdView addSubview:_iconImageView];
[_nativeAdView addSubview:_titleLabel];
[_nativeAdView addSubview:_advertiserLabel];
[_nativeAdView addSubview:_bodyLabel];
[_nativeAdView addSubview:_mediaContentView];
[_nativeAdView addSubview:_callToActionButton];
// Step 4: Auto Layout 제약 설정
[NSLayoutConstraint activateConstraints:@[
// nativeAdView - 부모 뷰를 채움
[_nativeAdView.topAnchor constraintEqualToAnchor:self.topAnchor],
[_nativeAdView.leadingAnchor constraintEqualToAnchor:self.leadingAnchor],
[_nativeAdView.trailingAnchor constraintEqualToAnchor:self.trailingAnchor],
[_nativeAdView.bottomAnchor constraintEqualToAnchor:self.bottomAnchor],
// 아이콘 - 좌상단, 60x60
[_iconImageView.topAnchor constraintEqualToAnchor:_nativeAdView.topAnchor],
[_iconImageView.leadingAnchor constraintEqualToAnchor:_nativeAdView.leadingAnchor],
[_iconImageView.widthAnchor constraintEqualToConstant:60],
[_iconImageView.heightAnchor constraintEqualToConstant:60],
// 제목 - 아이콘 옆
[_titleLabel.topAnchor constraintEqualToAnchor:_nativeAdView.topAnchor],
[_titleLabel.leadingAnchor constraintEqualToAnchor:_iconImageView.trailingAnchor constant:12],
[_titleLabel.trailingAnchor constraintEqualToAnchor:_nativeAdView.trailingAnchor],
// 광고주 - 제목 아래
[_advertiserLabel.topAnchor constraintEqualToAnchor:_titleLabel.bottomAnchor constant:4],
[_advertiserLabel.leadingAnchor constraintEqualToAnchor:_titleLabel.leadingAnchor],
[_advertiserLabel.trailingAnchor constraintEqualToAnchor:_nativeAdView.trailingAnchor],
// 본문 - 아이콘과 광고주 아래
[_bodyLabel.topAnchor constraintEqualToAnchor:_iconImageView.bottomAnchor constant:12],
[_bodyLabel.leadingAnchor constraintEqualToAnchor:_nativeAdView.leadingAnchor],
[_bodyLabel.trailingAnchor constraintEqualToAnchor:_nativeAdView.trailingAnchor],
// 미디어 콘텐츠 - 본문 아래
[_mediaContentView.topAnchor constraintEqualToAnchor:_bodyLabel.bottomAnchor constant:12],
[_mediaContentView.leadingAnchor constraintEqualToAnchor:_nativeAdView.leadingAnchor],
[_mediaContentView.trailingAnchor constraintEqualToAnchor:_nativeAdView.trailingAnchor],
[_mediaContentView.heightAnchor constraintEqualToConstant:200],
// CTA 버튼 - 하단
[_callToActionButton.topAnchor constraintEqualToAnchor:_mediaContentView.bottomAnchor constant:12],
[_callToActionButton.leadingAnchor constraintEqualToAnchor:_nativeAdView.leadingAnchor],
[_callToActionButton.trailingAnchor constraintEqualToAnchor:_nativeAdView.trailingAnchor],
[_callToActionButton.heightAnchor constraintEqualToConstant:44],
[_callToActionButton.bottomAnchor constraintEqualToAnchor:_nativeAdView.bottomAnchor]
]];
// Step 5: 네이티브 광고 뷰에 UI 컴포넌트 바인딩
[_nativeAdView bindNativeViewsWithIconImageView:_iconImageView
titleLabel:_titleLabel
advertiserLabel:_advertiserLabel
bodyLabel:_bodyLabel
mediaContentView:_mediaContentView
callToActionButton:_callToActionButton];
}
- (void)setDelegate:(id)delegate {
_delegate = delegate;
_nativeAdView.delegate = delegate;
}
- (void)loadNativeAd {
[_nativeAdView loadNativeAd];
}
@end
```
### 네이티브 광고 사용 예제
네이티브 광고를 사용하는 예시입니다.
#### 기본 사용법
```swift theme={null}
class ExampleViewController: UIViewController {
private var nativeAdView: DaroLargeNativeAdContentView?
override func viewDidLoad() {
super.viewDidLoad()
setupNativeAd()
}
private func setupNativeAd() {
let adUnit = DaroAdUnit(unitId: "your_native_unit_id")
nativeAdView = DaroLargeNativeAdContentView(unit: adUnit)
guard let nativeAdView = nativeAdView else { return }
nativeAdView.translatesAutoresizingMaskIntoConstraints = false
view.addSubview(nativeAdView)
NSLayoutConstraint.activate([
nativeAdView.centerXAnchor.constraint(equalTo: view.centerXAnchor),
nativeAdView.widthAnchor.constraint(equalToConstant: 300),
nativeAdView.heightAnchor.constraint(equalToConstant: 500),
nativeAdView.topAnchor.constraint(equalTo: view.safeAreaLayoutGuide.topAnchor, constant: 20)
])
nativeAdView.listener.onAdClicked = { adInfo in
print("[DARO] Listener Native Ad clicked: \(adInfo)")
}
nativeAdView.listener.onAdImpression = { adInfo in
print("[DARO] Listener Native Ad impression: \(adInfo)")
}
nativeAdView.listener.onAdLoadSuccess = { ad, adInfo in
print("[DARO] Listener Native Ad loaded: \(ad) \(adInfo)")
}
nativeAdView.listener.onAdLoadFail = { error in
print("[DARO] Listener Native Ad failed: \(error)")
}
nativeAdView.loadAd()
}
}
```
```objc theme={null}
@interface ExampleViewController ()
@property (nonatomic, strong) CustomDaroNativeView *nativeAdView;
@end
@implementation ExampleViewController
- (void)viewDidLoad {
[super viewDidLoad];
[self setupNativeAd];
}
- (void)setupNativeAd {
self.nativeAdView = [[CustomDaroNativeView alloc]
initWithUnitId:@"your_native_unit_id"];
self.nativeAdView.delegate = self;
self.nativeAdView.translatesAutoresizingMaskIntoConstraints = NO;
[self.view addSubview:self.nativeAdView];
[NSLayoutConstraint activateConstraints:@[
[self.nativeAdView.centerXAnchor constraintEqualToAnchor:self.view.centerXAnchor],
[self.nativeAdView.widthAnchor constraintEqualToConstant:300],
[self.nativeAdView.heightAnchor constraintEqualToConstant:500],
[self.nativeAdView.topAnchor constraintEqualToAnchor:self.view.safeAreaLayoutGuide.topAnchor constant:20]
]];
[self.nativeAdView loadNativeAd];
}
#pragma mark - DaroObjCNativeViewDelegate
- (void)nativeViewDidLoad:(DaroObjCNativeView *)nativeView
adInfo:(DaroObjCAdInfo *)adInfo {
NSLog(@"[DARO] Native ad loaded - Unit: %@", adInfo.adUnitId);
}
- (void)nativeView:(DaroObjCNativeView *)nativeView
didFailWithError:(NSError *)error {
NSLog(@"[DARO] Failed to load: %@", error.localizedDescription);
}
- (void)nativeViewDidClick:(DaroObjCNativeView *)nativeView
adInfo:(DaroObjCAdInfo *)adInfo {
NSLog(@"[DARO] Native ad clicked");
}
- (void)nativeViewDidRecordImpression:(DaroObjCNativeView *)nativeView
adInfo:(DaroObjCAdInfo *)adInfo {
NSLog(@"[DARO] Impression recorded");
}
@end
```
> **Note**: 네이티브 광고는 생성 시 자동으로 초기 광고를 로드합니다.
#### 수동 초기 로드 설정
광고의 초기 로드 시점을 직접 제어하려면 `autoLoad` 파라미터를 사용할 수 있습니다.
```swift theme={null}
// 네이티브 광고 - 수동 초기 로드 모드
let nativeAdView = DaroLargeNativeAdContentView(
unit: adUnit,
autoLoad: false // 자동 초기 로드 비활성화
)
// 원하는 시점에 초기 광고 로드
nativeAdView.loadAd()
```
```objc theme={null}
// 네이티브 광고 - 수동 초기 로드 모드
CustomDaroNativeView *nativeAdView = [[CustomDaroNativeView alloc]
initWithUnitId:@"your_native_unit_id"
autoLoad:NO]; // 자동 초기 로드 비활성화
// 원하는 시점에 초기 광고 로드
[nativeAdView loadNativeAd];
```
##### autoLoad 파라미터
* `true` (기본값): 뷰 생성 시 자동으로 초기 광고 로드
* `false`: 수동으로 `loadAd()` 호출 시 초기 광고 로드
수동 초기 로드는 다음과 같은 경우에 유용합니다:
* 특정 사용자 액션 후에 광고를 표시하고 싶을 때
* 화면 전환 시 광고 로드 타이밍을 제어하고 싶을 때
* 네트워크 상태를 확인한 후 광고를 로드하고 싶을 때
**참고**: 로드 이후 광고 새로고침은 SDK가 자동으로 관리합니다.
***
## AdChoice 표시 위치
`preferredAdChoicesPosition` 옵션으로 광고 뷰 내에서 AdChoices 아이콘이 렌더되는 모서리를 지정할 수 있습니다. 지정하지 않으면 우하단(`.bottomRight`)이 사용됩니다. iOS SDK에서는 **Daro / DaroM 모두 동일하게 지원**되며, `DaroLargeNativeAdContentView`, `DaroAdLineBannerView` 등 모든 네이티브 뷰에 적용할 수 있습니다.
지원 값: `topLeft`, `topRight`, `bottomLeft`, `bottomRight`.
### DaroAdChoicesPosition
```swift theme={null}
@objc public enum DaroAdChoicesPosition: Int {
case topLeft
case topRight
case bottomRight // 기본값
case bottomLeft
}
```
* Objective-C 호환 `@objc` enum — Swift/Objective-C 양쪽에서 동일 타입으로 사용합니다.
* 값을 지정하지 않으면 `.bottomRight` (Objective-C에서는 `DaroAdChoicesPositionBottomRight`) 가 기본으로 사용됩니다.
```swift theme={null}
let adUnit = DaroAdUnit(unitId: "your_native_unit_id")
// 좌상단에 AdChoices 아이콘 표시
let nativeAdView = DaroLargeNativeAdContentView(
unit: adUnit,
preferredAdChoicesPosition: .topLeft
)
```
`DaroAdLineBannerView` 등 다른 네이티브 뷰도 동일하게 `preferredAdChoicesPosition` 파라미터를 지원합니다.
```objc theme={null}
DaroObjCNativeView *nativeAdView = [[DaroObjCNativeView alloc]
initWithUnitId:@"your_native_unit_id"
autoLoad:YES
preferredAdChoicesPosition:DaroAdChoicesPositionTopLeft];
```
**설정 시점 고정**
`preferredAdChoicesPosition`은 광고 뷰 생성(init) 시점에 고정되며, 이후 변경할 수 없습니다. 다른 위치로 바꾸려면 뷰를 새로 생성해 주세요.
**디맨드별 동작 차이 (선호 위치, 보장 아님)**
`preferredAdChoicesPosition` 은 "이 위치에 AdChoices 아이콘을 넣어달라"고 디맨드에 요청하는 값입니다. 하지만 실제로 어디에 표시되는지는 각 디맨드가 결정하기 때문에 요청한 위치가 반드시 반영되지는 않습니다.
디맨드마다 반응이 다를 수 있습니다.
* 요청한 위치 그대로 반영하는 디맨드
* 요청을 무시하고 자체적으로 고정된 위치에 표시하는 디맨드
* AdChoices 아이콘 대신 자체 광고 표시(예: 광고 마크) 로 대체하는 디맨드
어느 경우든 광고 관련 컴플라이언스 요건은 충족됩니다.
따라서 광고 레이아웃을 디자인할 때는 **네 모서리 어디에든 AdChoices/광고 마크가 표시될 수 있다**고 가정하고, 각 모서리에 충분한 여백을 확보해두는 것을 권장합니다.
***
## 네이티브 템플릿
DARO SDK는 기본적인 네이티브 광고 템플릿을 제공합니다. 이를 통해 커스텀 뷰를 구현하지 않고도 네이티브 광고를 쉽게 구현할 수 있습니다.
### 라인 배너 템플릿
`DaroAdLineBannerView`는 가로 형태의 네이티브 광고 템플릿입니다. 다음과 같은 특징을 가집니다:
* 아이콘, 제목, 광고주 정보를 포함한 기본적인 레이아웃
* 광고 마크 표시
**네이티브 광고 필수 요소 4가지**
네이티브 광고는 앱 UI에 맞게 자유롭게 디자인할 수 있지만, 아래의 **4가지 필수 요소는 반드시 포함**해야 합니다. 이는 사용자가 광고임을 명확히 인지하도록 하고, 광고주가 기대하는 최소한의 광고 효과를 보장하기 위한 광고 정책입니다.
1. 광고 표기 : 사용자가 광고임을 명확히 인지할 수 있도록 광고 영역에 "AD", "광고" 등의 표기를 추가해 주세요.
2. AdChoices 아이콘 : AdChoices 아이콘은 사용자가 광고를 식별하고 제어할 수 있도록 제공되는 아이콘으로, 일반적으로 'ⓘ' 모양으로 표시됩니다. 해당 아이콘은 DARO SDK에서 자동으로 삽입되므로 별도 구현은 필요하지 않습니다. 광고 뷰의 4개 모서리(좌상단/우상단/우하단/좌하단) 중 한 곳에 배치되며, 기본 위치는 우하단입니다. `preferredAdChoicesPosition` 옵션으로 원하는 모서리를 선택할 수 있으니 (자세한 내용은 아래 [AdChoice 표시 위치](#adchoice-표시-위치) 섹션 참고), 해당 위치가 다른 UI 요소와 겹치거나 가려지지 않도록 광고 뷰를 구성해 주세요. 광고 소스(디맨드)에 따라 아이콘의 형태나 동작이 다를 수 있습니다.
3. 광고 제목 (타이틀) : 광고의 제목을 표시해야 합니다.
4. 클릭 유도 문안(CTA) : "설치", "열기", "다운로드" 등의 CTA(Call to Action) 버튼을 반드시 포함해 주세요. 버튼의 크기나 형태는 자유롭게 구성할 수 있으며, 상황에 따라 텍스트 필드로 대체 가능합니다. 광고 소스(디맨드)에서 CTA 문구를 제공하므로, 특정 문구를 고정할 필요는 없습니다.
***
## 광고 단위 설정
대시보드에서 발급받은 `ad unit ID`를 사용하여 광고 단위를 설정하세요.
```swift theme={null}
let adUnit = DaroAdUnit(unitId: "your_native_unit_id")
```
```objc theme={null}
// Objective-C에서는 DaroAdUnit을 별도로 생성하지 않고
// 초기화 시 unitId를 직접 전달합니다
NSString *nativeUnitId = @"your_native_unit_id";
```
## 네이티브 광고 구현
### 기본 구현
Swift에서는 `DaroAdNativeView`를 상속하여 커스텀 뷰를 구현합니다.
```swift theme={null}
final class DaroLargeNativeAdContentView: DaroAdNativeView {
override init(unit: DaroAdUnit) {
super.init(unit: unit)
layout()
}
@available(*, unavailable)
public required init?(coder: NSCoder) {
fatalError("init(coder:) has not been implemented")
}
var containerView = UIView()
var iconImageView: UIImageView = {
let view = UIImageView()
view.contentMode = .scaleAspectFill
view.layer.cornerRadius = 4
view.clipsToBounds = true
view.isHidden = false
return view
}()
var titleLabel: UILabel = {
let label = UILabel()
label.isUserInteractionEnabled = false
label.clipsToBounds = true
label.font = .systemFont(ofSize: 15, weight: .bold)
label.textColor = UIColor.white
label.numberOfLines = 2
return label
}()
var advertiserLabel: UILabel = {
let label = UILabel()
label.isUserInteractionEnabled = false
label.clipsToBounds = true
label.font = .systemFont(ofSize: 12, weight: .regular)
label.numberOfLines = 2
label.textColor = UIColor.white
return label
}()
/// Media View
let mediaContentView: UIView = UIView()
/// Call to Action
var callToActionButton: UIButton = {
let button = UIButton()
button.translatesAutoresizingMaskIntoConstraints = false
button.clipsToBounds = true
button.titleLabel?.font = .systemFont(ofSize: 20, weight: .bold)
button.setTitleColor(.label, for: .normal)
button.backgroundColor = UIColor.systemGray3
button.layer.cornerRadius = 4
return button
}()
/// Body
var bodyLabel: UILabel = {
let label = UILabel()
label.isUserInteractionEnabled = false
label.clipsToBounds = true
label.font = .systemFont(ofSize: 15, weight: .regular)
label.numberOfLines = 2
label.textColor = UIColor.white
return label
}()
private func layout() {
translatesAutoresizingMaskIntoConstraints = false
let blurEffect = UIBlurEffect(style: .systemMaterialDark)
let blurView = UIVisualEffectView(effect: blurEffect)
blurView.translatesAutoresizingMaskIntoConstraints = false
blurView.isUserInteractionEnabled = false
containerView.addSubview(blurView)
NSLayoutConstraint.activate([
blurView.leadingAnchor.constraint(equalTo: containerView.leadingAnchor),
blurView.trailingAnchor.constraint(equalTo: containerView.trailingAnchor),
blurView.topAnchor.constraint(equalTo: containerView.topAnchor),
blurView.bottomAnchor.constraint(equalTo: containerView.bottomAnchor),
])
containerView.clipsToBounds = true
addSubview(containerView)
containerView.translatesAutoresizingMaskIntoConstraints = false
NSLayoutConstraint.activate([
containerView.leadingAnchor.constraint(equalTo: leadingAnchor),
containerView.trailingAnchor.constraint(equalTo: trailingAnchor),
containerView.topAnchor.constraint(equalTo: topAnchor),
containerView.bottomAnchor.constraint(equalTo: bottomAnchor),
])
[
mediaContentView,
iconImageView,
titleLabel,
advertiserLabel,
bodyLabel,
callToActionButton,
]
.forEach {
containerView.addSubview($0)
$0.translatesAutoresizingMaskIntoConstraints = false
}
activateLayout()
}
func activateLayout() {
NSLayoutConstraint.activate([
iconImageView.topAnchor.constraint(equalTo: containerView.topAnchor, constant: 10),
iconImageView.leftAnchor.constraint(equalTo: containerView.leftAnchor, constant: 10),
iconImageView.heightAnchor.constraint(equalToConstant: 70),
iconImageView.widthAnchor.constraint(equalToConstant: 70),
titleLabel.topAnchor.constraint(equalTo: iconImageView.topAnchor),
titleLabel.leftAnchor.constraint(equalTo: iconImageView.rightAnchor, constant: 10),
titleLabel.rightAnchor.constraint(equalTo: containerView.rightAnchor, constant: -10),
advertiserLabel.bottomAnchor.constraint(equalTo: iconImageView.bottomAnchor),
advertiserLabel.leftAnchor.constraint(equalTo: iconImageView.rightAnchor, constant: 10),
bodyLabel.topAnchor.constraint(equalTo: iconImageView.bottomAnchor, constant: 10),
bodyLabel.leftAnchor.constraint(equalTo: containerView.leftAnchor, constant: 10),
bodyLabel.rightAnchor.constraint(equalTo: containerView.rightAnchor, constant: -10),
mediaContentView.topAnchor.constraint(equalTo: bodyLabel.bottomAnchor, constant: 10),
mediaContentView.widthAnchor.constraint(equalTo: containerView.widthAnchor),
mediaContentView.heightAnchor.constraint(equalTo: containerView.widthAnchor),
mediaContentView.centerYAnchor.constraint(equalTo: containerView.centerYAnchor),
mediaContentView.centerXAnchor.constraint(equalTo: containerView.centerXAnchor),
callToActionButton.topAnchor.constraint(equalTo: mediaContentView.bottomAnchor, constant: 10),
callToActionButton.bottomAnchor.constraint(equalTo: containerView.bottomAnchor, constant: -10),
callToActionButton.leftAnchor.constraint(equalTo: containerView.leftAnchor, constant: 20),
callToActionButton.rightAnchor.constraint(equalTo: containerView.rightAnchor, constant: -20),
])
bindViews(
titleLabel: titleLabel,
advertiserLabel: advertiserLabel,
bodyLabel: bodyLabel,
iconImageView: iconImageView,
mediaContentView: mediaContentView,
callToActionButton: callToActionButton
)
}
}
```
Objective-C에서는 `UIView`를 상속하고 내부에 `DaroObjCNativeView`를 포함하는 커스텀 뷰를 구현합니다.
**중요: 뷰 계층 구조**
Objective-C에서 네이티브 광고를 구현할 때는 **모든 UI 컴포넌트를 반드시 `nativeAdView`에 추가**해야 합니다.
`self`가 아닌 `_nativeAdView`에 `addSubview`를 호출하는 것에 주의하세요.
```objc theme={null}
// ❌ 잘못된 예시
[self addSubview:_titleLabel];
// ✅ 올바른 예시
[_nativeAdView addSubview:_titleLabel];
```
**헤더 파일 (CustomDaroNativeView\.h):**
```objc theme={null}
#import
@class DaroObjCNativeView;
@protocol DaroObjCNativeViewDelegate;
@interface CustomDaroNativeView : UIView
@property (nonatomic, strong, readonly) UIImageView *iconImageView;
@property (nonatomic, strong, readonly) UILabel *titleLabel;
@property (nonatomic, strong, readonly) UILabel *advertiserLabel;
@property (nonatomic, strong, readonly) UILabel *bodyLabel;
@property (nonatomic, strong, readonly) UIView *mediaContentView;
@property (nonatomic, strong, readonly) UIButton *callToActionButton;
@property (nonatomic, strong, readonly) DaroObjCNativeView *nativeAdView;
@property (nonatomic, weak, nullable) id delegate;
- (instancetype)initWithUnitId:(NSString *)unitId;
- (instancetype)initWithUnitId:(NSString *)unitId autoLoad:(BOOL)autoLoad;
- (void)loadNativeAd;
@end
```
**구현 파일 (CustomDaroNativeView\.m):**
```objc theme={null}
#import "CustomDaroNativeView.h"
#import
@interface CustomDaroNativeView ()
@property (nonatomic, strong, readwrite) UIImageView *iconImageView;
@property (nonatomic, strong, readwrite) UILabel *titleLabel;
@property (nonatomic, strong, readwrite) UILabel *advertiserLabel;
@property (nonatomic, strong, readwrite) UILabel *bodyLabel;
@property (nonatomic, strong, readwrite) UIView *mediaContentView;
@property (nonatomic, strong, readwrite) UIButton *callToActionButton;
@property (nonatomic, strong, readwrite) DaroObjCNativeView *nativeAdView;
@end
@implementation CustomDaroNativeView
- (instancetype)initWithUnitId:(NSString *)unitId {
return [self initWithUnitId:unitId autoLoad:NO];
}
- (instancetype)initWithUnitId:(NSString *)unitId autoLoad:(BOOL)autoLoad {
self = [super initWithFrame:CGRectZero];
if (self) {
// DaroObjCNativeView 생성
_nativeAdView = [[DaroObjCNativeView alloc] initWithUnitId:unitId autoLoad:NO];
[self setupCustomLayout];
}
return self;
}
- (void)setupCustomLayout {
// Step 1: nativeAdView를 self에 추가
_nativeAdView.translatesAutoresizingMaskIntoConstraints = NO;
[self addSubview:_nativeAdView];
// Step 2: UI 컴포넌트 생성
_iconImageView = [[UIImageView alloc] init];
_iconImageView.contentMode = UIViewContentModeScaleAspectFill;
_iconImageView.layer.cornerRadius = 8;
_iconImageView.clipsToBounds = YES;
_iconImageView.translatesAutoresizingMaskIntoConstraints = NO;
_titleLabel = [[UILabel alloc] init];
_titleLabel.font = [UIFont boldSystemFontOfSize:17];
_titleLabel.numberOfLines = 2;
_titleLabel.translatesAutoresizingMaskIntoConstraints = NO;
_advertiserLabel = [[UILabel alloc] init];
_advertiserLabel.font = [UIFont systemFontOfSize:13];
_advertiserLabel.textColor = [UIColor secondaryLabelColor];
_advertiserLabel.numberOfLines = 1;
_advertiserLabel.translatesAutoresizingMaskIntoConstraints = NO;
_bodyLabel = [[UILabel alloc] init];
_bodyLabel.font = [UIFont systemFontOfSize:14];
_bodyLabel.numberOfLines = 3;
_bodyLabel.translatesAutoresizingMaskIntoConstraints = NO;
_mediaContentView = [[UIView alloc] init];
_mediaContentView.backgroundColor = [UIColor systemGray5Color];
_mediaContentView.layer.cornerRadius = 8;
_mediaContentView.clipsToBounds = YES;
_mediaContentView.translatesAutoresizingMaskIntoConstraints = NO;
_callToActionButton = [UIButton buttonWithType:UIButtonTypeSystem];
_callToActionButton.titleLabel.font = [UIFont boldSystemFontOfSize:16];
_callToActionButton.backgroundColor = [UIColor systemBlueColor];
[_callToActionButton setTitleColor:[UIColor whiteColor] forState:UIControlStateNormal];
_callToActionButton.layer.cornerRadius = 8;
_callToActionButton.translatesAutoresizingMaskIntoConstraints = NO;
// Step 3: ⚠️ 중요 - UI 컴포넌트를 nativeAdView에 추가
// self가 아닌 _nativeAdView에 추가해야 합니다!
[_nativeAdView addSubview:_iconImageView];
[_nativeAdView addSubview:_titleLabel];
[_nativeAdView addSubview:_advertiserLabel];
[_nativeAdView addSubview:_bodyLabel];
[_nativeAdView addSubview:_mediaContentView];
[_nativeAdView addSubview:_callToActionButton];
// Step 4: Auto Layout 제약 설정
[NSLayoutConstraint activateConstraints:@[
// nativeAdView - 부모 뷰를 채움
[_nativeAdView.topAnchor constraintEqualToAnchor:self.topAnchor],
[_nativeAdView.leadingAnchor constraintEqualToAnchor:self.leadingAnchor],
[_nativeAdView.trailingAnchor constraintEqualToAnchor:self.trailingAnchor],
[_nativeAdView.bottomAnchor constraintEqualToAnchor:self.bottomAnchor],
// 아이콘 - 좌상단, 60x60
[_iconImageView.topAnchor constraintEqualToAnchor:_nativeAdView.topAnchor],
[_iconImageView.leadingAnchor constraintEqualToAnchor:_nativeAdView.leadingAnchor],
[_iconImageView.widthAnchor constraintEqualToConstant:60],
[_iconImageView.heightAnchor constraintEqualToConstant:60],
// 제목 - 아이콘 옆
[_titleLabel.topAnchor constraintEqualToAnchor:_nativeAdView.topAnchor],
[_titleLabel.leadingAnchor constraintEqualToAnchor:_iconImageView.trailingAnchor constant:12],
[_titleLabel.trailingAnchor constraintEqualToAnchor:_nativeAdView.trailingAnchor],
// 광고주 - 제목 아래
[_advertiserLabel.topAnchor constraintEqualToAnchor:_titleLabel.bottomAnchor constant:4],
[_advertiserLabel.leadingAnchor constraintEqualToAnchor:_titleLabel.leadingAnchor],
[_advertiserLabel.trailingAnchor constraintEqualToAnchor:_nativeAdView.trailingAnchor],
// 본문 - 아이콘과 광고주 아래
[_bodyLabel.topAnchor constraintEqualToAnchor:_iconImageView.bottomAnchor constant:12],
[_bodyLabel.leadingAnchor constraintEqualToAnchor:_nativeAdView.leadingAnchor],
[_bodyLabel.trailingAnchor constraintEqualToAnchor:_nativeAdView.trailingAnchor],
// 미디어 콘텐츠 - 본문 아래
[_mediaContentView.topAnchor constraintEqualToAnchor:_bodyLabel.bottomAnchor constant:12],
[_mediaContentView.leadingAnchor constraintEqualToAnchor:_nativeAdView.leadingAnchor],
[_mediaContentView.trailingAnchor constraintEqualToAnchor:_nativeAdView.trailingAnchor],
[_mediaContentView.heightAnchor constraintEqualToConstant:200],
// CTA 버튼 - 하단
[_callToActionButton.topAnchor constraintEqualToAnchor:_mediaContentView.bottomAnchor constant:12],
[_callToActionButton.leadingAnchor constraintEqualToAnchor:_nativeAdView.leadingAnchor],
[_callToActionButton.trailingAnchor constraintEqualToAnchor:_nativeAdView.trailingAnchor],
[_callToActionButton.heightAnchor constraintEqualToConstant:44],
[_callToActionButton.bottomAnchor constraintEqualToAnchor:_nativeAdView.bottomAnchor]
]];
// Step 5: 네이티브 광고 뷰에 UI 컴포넌트 바인딩
[_nativeAdView bindNativeViewsWithIconImageView:_iconImageView
titleLabel:_titleLabel
advertiserLabel:_advertiserLabel
bodyLabel:_bodyLabel
mediaContentView:_mediaContentView
callToActionButton:_callToActionButton];
}
- (void)setDelegate:(id)delegate {
_delegate = delegate;
_nativeAdView.delegate = delegate;
}
- (void)loadNativeAd {
[_nativeAdView loadNativeAd];
}
@end
```
### 네이티브 광고 사용 예제
네이티브 광고를 사용하는 예시입니다.
#### 기본 사용법
```swift theme={null}
class ExampleViewController: UIViewController {
private var nativeAdView: DaroLargeNativeAdContentView?
override func viewDidLoad() {
super.viewDidLoad()
setupNativeAd()
}
private func setupNativeAd() {
let adUnit = DaroAdUnit(unitId: "your_native_unit_id")
nativeAdView = DaroLargeNativeAdContentView(unit: adUnit)
guard let nativeAdView = nativeAdView else { return }
nativeAdView.translatesAutoresizingMaskIntoConstraints = false
view.addSubview(nativeAdView)
NSLayoutConstraint.activate([
nativeAdView.centerXAnchor.constraint(equalTo: view.centerXAnchor),
nativeAdView.widthAnchor.constraint(equalToConstant: 300),
nativeAdView.heightAnchor.constraint(equalToConstant: 500),
nativeAdView.topAnchor.constraint(equalTo: view.safeAreaLayoutGuide.topAnchor, constant: 20)
])
nativeAdView.listener.onAdClicked = { adInfo in
print("[DARO] Listener Native Ad clicked: \(adInfo)")
}
nativeAdView.listener.onAdImpression = { adInfo in
print("[DARO] Listener Native Ad impression: \(adInfo)")
}
nativeAdView.listener.onAdLoadSuccess = { ad, adInfo in
print("[DARO] Listener Native Ad loaded: \(ad) \(adInfo)")
}
nativeAdView.listener.onAdLoadFail = { error in
print("[DARO] Listener Native Ad failed: \(error)")
}
nativeAdView.loadAd()
}
}
```
```objc theme={null}
@interface ExampleViewController ()
@property (nonatomic, strong) CustomDaroNativeView *nativeAdView;
@end
@implementation ExampleViewController
- (void)viewDidLoad {
[super viewDidLoad];
[self setupNativeAd];
}
- (void)setupNativeAd {
self.nativeAdView = [[CustomDaroNativeView alloc]
initWithUnitId:@"your_native_unit_id"];
self.nativeAdView.delegate = self;
self.nativeAdView.translatesAutoresizingMaskIntoConstraints = NO;
[self.view addSubview:self.nativeAdView];
[NSLayoutConstraint activateConstraints:@[
[self.nativeAdView.centerXAnchor constraintEqualToAnchor:self.view.centerXAnchor],
[self.nativeAdView.widthAnchor constraintEqualToConstant:300],
[self.nativeAdView.heightAnchor constraintEqualToConstant:500],
[self.nativeAdView.topAnchor constraintEqualToAnchor:self.view.safeAreaLayoutGuide.topAnchor constant:20]
]];
[self.nativeAdView loadNativeAd];
}
#pragma mark - DaroObjCNativeViewDelegate
- (void)nativeViewDidLoad:(DaroObjCNativeView *)nativeView
adInfo:(DaroObjCAdInfo *)adInfo {
NSLog(@"[DARO] Native ad loaded - Unit: %@", adInfo.adUnitId);
}
- (void)nativeView:(DaroObjCNativeView *)nativeView
didFailWithError:(NSError *)error {
NSLog(@"[DARO] Failed to load: %@", error.localizedDescription);
}
- (void)nativeViewDidClick:(DaroObjCNativeView *)nativeView
adInfo:(DaroObjCAdInfo *)adInfo {
NSLog(@"[DARO] Native ad clicked");
}
- (void)nativeViewDidRecordImpression:(DaroObjCNativeView *)nativeView
adInfo:(DaroObjCAdInfo *)adInfo {
NSLog(@"[DARO] Impression recorded");
}
@end
```
> **Note**: 네이티브 광고는 생성 시 자동으로 초기 광고를 로드합니다.
#### 수동 초기 로드 설정
광고의 초기 로드 시점을 직접 제어하려면 `autoLoad` 파라미터를 사용할 수 있습니다.
```swift theme={null}
// 네이티브 광고 - 수동 초기 로드 모드
let nativeAdView = DaroLargeNativeAdContentView(
unit: adUnit,
autoLoad: false // 자동 초기 로드 비활성화
)
// 원하는 시점에 초기 광고 로드
nativeAdView.loadAd()
```
```objc theme={null}
// 네이티브 광고 - 수동 초기 로드 모드
CustomDaroNativeView *nativeAdView = [[CustomDaroNativeView alloc]
initWithUnitId:@"your_native_unit_id"
autoLoad:NO]; // 자동 초기 로드 비활성화
// 원하는 시점에 초기 광고 로드
[nativeAdView loadNativeAd];
```
##### autoLoad 파라미터
* `true` (기본값): 뷰 생성 시 자동으로 초기 광고 로드
* `false`: 수동으로 `loadAd()` 호출 시 초기 광고 로드
수동 초기 로드는 다음과 같은 경우에 유용합니다:
* 특정 사용자 액션 후에 광고를 표시하고 싶을 때
* 화면 전환 시 광고 로드 타이밍을 제어하고 싶을 때
* 네트워크 상태를 확인한 후 광고를 로드하고 싶을 때
**참고**: 로드 이후 광고 새로고침은 SDK가 자동으로 관리합니다.
***
## AdChoice 표시 위치
`preferredAdChoicesPosition` 옵션으로 광고 뷰 내에서 AdChoices 아이콘이 렌더되는 모서리를 지정할 수 있습니다. 지정하지 않으면 우하단(`.bottomRight`)이 사용됩니다. iOS SDK에서는 **Daro / DaroM 모두 동일하게 지원**되며, `DaroLargeNativeAdContentView`, `DaroAdLineBannerView` 등 모든 네이티브 뷰에 적용할 수 있습니다.
지원 값: `topLeft`, `topRight`, `bottomLeft`, `bottomRight`.
### DaroAdChoicesPosition
```swift theme={null}
@objc public enum DaroAdChoicesPosition: Int {
case topLeft
case topRight
case bottomRight // 기본값
case bottomLeft
}
```
* Objective-C 호환 `@objc` enum — Swift/Objective-C 양쪽에서 동일 타입으로 사용합니다.
* 값을 지정하지 않으면 `.bottomRight` (Objective-C에서는 `DaroAdChoicesPositionBottomRight`) 가 기본으로 사용됩니다.
```swift theme={null}
let adUnit = DaroAdUnit(unitId: "your_native_unit_id")
// 좌상단에 AdChoices 아이콘 표시
let nativeAdView = DaroLargeNativeAdContentView(
unit: adUnit,
preferredAdChoicesPosition: .topLeft
)
```
`DaroAdLineBannerView` 등 다른 네이티브 뷰도 동일하게 `preferredAdChoicesPosition` 파라미터를 지원합니다.
```objc theme={null}
DaroObjCNativeView *nativeAdView = [[DaroObjCNativeView alloc]
initWithUnitId:@"your_native_unit_id"
autoLoad:YES
preferredAdChoicesPosition:DaroAdChoicesPositionTopLeft];
```
**설정 시점 고정**
`preferredAdChoicesPosition`은 광고 뷰 생성(init) 시점에 고정되며, 이후 변경할 수 없습니다. 다른 위치로 바꾸려면 뷰를 새로 생성해 주세요.
**디맨드별 동작 차이 (선호 위치, 보장 아님)**
`preferredAdChoicesPosition` 은 "이 위치에 AdChoices 아이콘을 넣어달라"고 디맨드에 요청하는 값입니다. 하지만 실제로 어디에 표시되는지는 각 디맨드가 결정하기 때문에 요청한 위치가 반드시 반영되지는 않습니다.
디맨드마다 반응이 다를 수 있습니다.
* 요청한 위치 그대로 반영하는 디맨드
* 요청을 무시하고 자체적으로 고정된 위치에 표시하는 디맨드
* AdChoices 아이콘 대신 자체 광고 표시(예: 광고 마크) 로 대체하는 디맨드
어느 경우든 광고 관련 컴플라이언스 요건은 충족됩니다.
따라서 광고 레이아웃을 디자인할 때는 **네 모서리 어디에든 AdChoices/광고 마크가 표시될 수 있다**고 가정하고, 각 모서리에 충분한 여백을 확보해두는 것을 권장합니다.
***
## 네이티브 템플릿
DARO SDK는 기본적인 네이티브 광고 템플릿을 제공합니다. 이를 통해 커스텀 뷰를 구현하지 않고도 네이티브 광고를 쉽게 구현할 수 있습니다.
### 라인 배너 템플릿
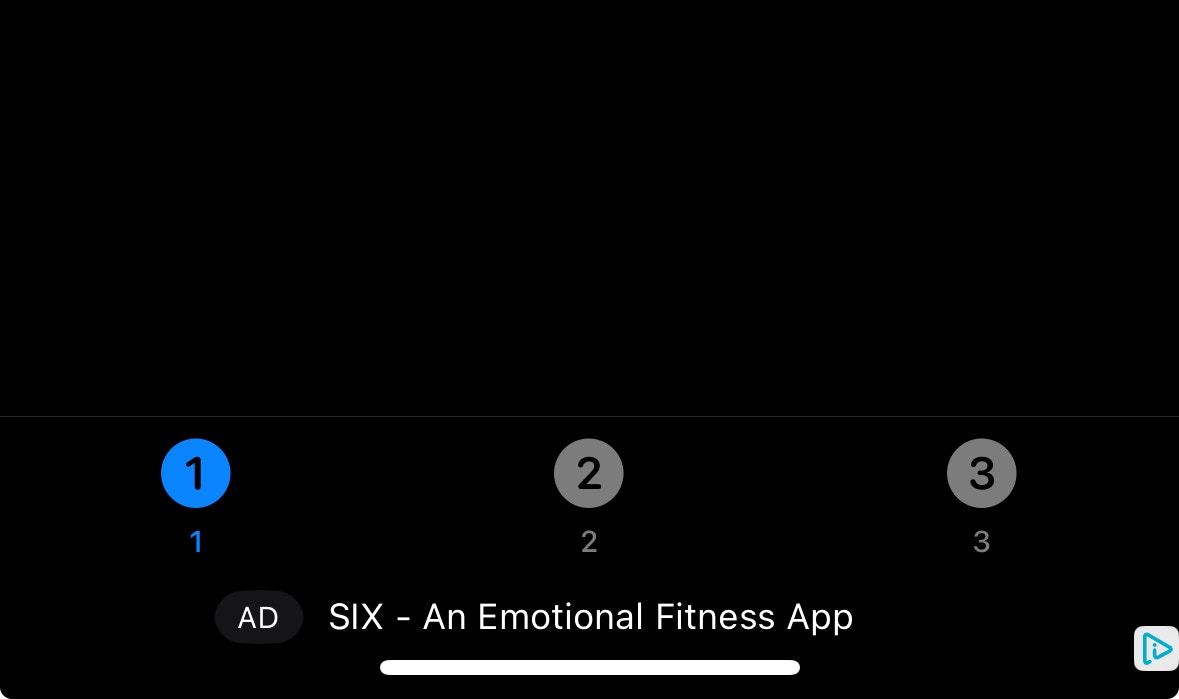
`DaroAdLineBannerView`는 가로 형태의 네이티브 광고 템플릿입니다. 다음과 같은 특징을 가집니다:
* 아이콘, 제목, 광고주 정보를 포함한 기본적인 레이아웃
* 광고 마크 표시
 ```swift theme={null}
class ExampleViewController: UIViewController {
private var lineBannerView: DaroAdLineBannerView?
override func viewDidLoad() {
super.viewDidLoad()
setupLineBannerAd()
}
private func setupLineBannerAd() {
let adUnit = DaroAdUnit(unitId: "your_native_unit_id")
lineBannerView = DaroAdLineBannerView(unit: adUnit)
guard let lineBannerView = lineBannerView else { return }
lineBannerView.translatesAutoresizingMaskIntoConstraints = false
view.addSubview(lineBannerView)
NSLayoutConstraint.activate([
lineBannerView.leadingAnchor.constraint(equalTo: view.leadingAnchor),
lineBannerView.trailingAnchor.constraint(equalTo: view.trailingAnchor),
lineBannerView.heightAnchor.constraint(equalToConstant: 36),
lineBannerView.bottomAnchor.constraint(equalTo: view.safeAreaLayoutGuide.bottomAnchor)
])
lineBannerView.listener.onAdClicked = { adInfo in
print("[DARO] Listener Line Banner Ad clicked: \(adInfo)")
}
lineBannerView.listener.onAdImpression = { adInfo in
print("[DARO] Listener Line Banner Ad impression: \(adInfo)")
}
lineBannerView.listener.onAdLoadSuccess = { ad, adInfo in
print("[DARO] Listener Line Banner Ad loaded: \(ad) \(adInfo)")
}
lineBannerView.listener.onAdLoadFail = { error in
print("[DARO] Listener Line Banner Ad failed: \(error)")
}
lineBannerView.loadAd()
}
}
```
**1. 헤더 파일에서 델리게이트 프로토콜 채택:**
```objc theme={null}
@interface ExampleViewController ()
@property (nonatomic, strong) DaroObjCLineBannerView *lineBannerView;
@end
```
**2. 라인 배너 설정 및 로드:**
```objc theme={null}
- (void)setupLineBannerAd {
self.lineBannerView = [[DaroObjCLineBannerView alloc]
initWithUnitId:@"your_native_unit_id"];
self.lineBannerView.delegate = self;
self.lineBannerView.translatesAutoresizingMaskIntoConstraints = NO;
[self.view addSubview:self.lineBannerView];
[NSLayoutConstraint activateConstraints:@[
[self.lineBannerView.leadingAnchor constraintEqualToAnchor:self.view.leadingAnchor],
[self.lineBannerView.trailingAnchor constraintEqualToAnchor:self.view.trailingAnchor],
[self.lineBannerView.heightAnchor constraintEqualToConstant:36],
[self.lineBannerView.bottomAnchor constraintEqualToAnchor:self.view.safeAreaLayoutGuide.bottomAnchor]
]];
[self.lineBannerView loadAd];
}
```
**3. 델리게이트 메서드 구현:**
```objc theme={null}
#pragma mark - DaroObjCLineBannerViewDelegate
- (void)lineBannerViewDidLoad:(DaroObjCLineBannerView *)lineBannerView
adInfo:(DaroObjCAdInfo *)adInfo {
NSLog(@"[DARO] Line Banner loaded - Unit: %@", adInfo.adUnitId);
}
- (void)lineBannerView:(DaroObjCLineBannerView *)lineBannerView
didFailWithError:(NSError *)error {
NSLog(@"[DARO] Failed to load: %@", error.localizedDescription);
}
- (void)lineBannerViewDidClick:(DaroObjCLineBannerView *)lineBannerView
adInfo:(DaroObjCAdInfo *)adInfo {
NSLog(@"[DARO] Line Banner clicked");
}
- (void)lineBannerViewDidRecordImpression:(DaroObjCLineBannerView *)lineBannerView
adInfo:(DaroObjCAdInfo *)adInfo {
NSLog(@"[DARO] Line Banner impression recorded");
}
```
> **Note**: 라인 배너 템플릿도 생성 시 자동으로 초기 광고를 로드합니다.
#### 정렬 옵션
`alignment` 파라미터를 통해 라인 배너의 콘텐츠 정렬 방향을 설정할 수 있습니다.
| 옵션 | 설명 |
| --------------- | ----- |
| `.left` | 좌측 정렬 |
| `.center` (기본값) | 중앙 정렬 |
| `.right` | 우측 정렬 |
```swift theme={null}
class ExampleViewController: UIViewController {
private var lineBannerView: DaroAdLineBannerView?
override func viewDidLoad() {
super.viewDidLoad()
setupLineBannerAd()
}
private func setupLineBannerAd() {
let adUnit = DaroAdUnit(unitId: "your_native_unit_id")
lineBannerView = DaroAdLineBannerView(unit: adUnit)
guard let lineBannerView = lineBannerView else { return }
lineBannerView.translatesAutoresizingMaskIntoConstraints = false
view.addSubview(lineBannerView)
NSLayoutConstraint.activate([
lineBannerView.leadingAnchor.constraint(equalTo: view.leadingAnchor),
lineBannerView.trailingAnchor.constraint(equalTo: view.trailingAnchor),
lineBannerView.heightAnchor.constraint(equalToConstant: 36),
lineBannerView.bottomAnchor.constraint(equalTo: view.safeAreaLayoutGuide.bottomAnchor)
])
lineBannerView.listener.onAdClicked = { adInfo in
print("[DARO] Listener Line Banner Ad clicked: \(adInfo)")
}
lineBannerView.listener.onAdImpression = { adInfo in
print("[DARO] Listener Line Banner Ad impression: \(adInfo)")
}
lineBannerView.listener.onAdLoadSuccess = { ad, adInfo in
print("[DARO] Listener Line Banner Ad loaded: \(ad) \(adInfo)")
}
lineBannerView.listener.onAdLoadFail = { error in
print("[DARO] Listener Line Banner Ad failed: \(error)")
}
lineBannerView.loadAd()
}
}
```
**1. 헤더 파일에서 델리게이트 프로토콜 채택:**
```objc theme={null}
@interface ExampleViewController ()
@property (nonatomic, strong) DaroObjCLineBannerView *lineBannerView;
@end
```
**2. 라인 배너 설정 및 로드:**
```objc theme={null}
- (void)setupLineBannerAd {
self.lineBannerView = [[DaroObjCLineBannerView alloc]
initWithUnitId:@"your_native_unit_id"];
self.lineBannerView.delegate = self;
self.lineBannerView.translatesAutoresizingMaskIntoConstraints = NO;
[self.view addSubview:self.lineBannerView];
[NSLayoutConstraint activateConstraints:@[
[self.lineBannerView.leadingAnchor constraintEqualToAnchor:self.view.leadingAnchor],
[self.lineBannerView.trailingAnchor constraintEqualToAnchor:self.view.trailingAnchor],
[self.lineBannerView.heightAnchor constraintEqualToConstant:36],
[self.lineBannerView.bottomAnchor constraintEqualToAnchor:self.view.safeAreaLayoutGuide.bottomAnchor]
]];
[self.lineBannerView loadAd];
}
```
**3. 델리게이트 메서드 구현:**
```objc theme={null}
#pragma mark - DaroObjCLineBannerViewDelegate
- (void)lineBannerViewDidLoad:(DaroObjCLineBannerView *)lineBannerView
adInfo:(DaroObjCAdInfo *)adInfo {
NSLog(@"[DARO] Line Banner loaded - Unit: %@", adInfo.adUnitId);
}
- (void)lineBannerView:(DaroObjCLineBannerView *)lineBannerView
didFailWithError:(NSError *)error {
NSLog(@"[DARO] Failed to load: %@", error.localizedDescription);
}
- (void)lineBannerViewDidClick:(DaroObjCLineBannerView *)lineBannerView
adInfo:(DaroObjCAdInfo *)adInfo {
NSLog(@"[DARO] Line Banner clicked");
}
- (void)lineBannerViewDidRecordImpression:(DaroObjCLineBannerView *)lineBannerView
adInfo:(DaroObjCAdInfo *)adInfo {
NSLog(@"[DARO] Line Banner impression recorded");
}
```
> **Note**: 라인 배너 템플릿도 생성 시 자동으로 초기 광고를 로드합니다.
#### 정렬 옵션
`alignment` 파라미터를 통해 라인 배너의 콘텐츠 정렬 방향을 설정할 수 있습니다.
| 옵션 | 설명 |
| --------------- | ----- |
| `.left` | 좌측 정렬 |
| `.center` (기본값) | 중앙 정렬 |
| `.right` | 우측 정렬 |


 ```swift theme={null}
// 좌측 정렬
let lineBannerView = DaroAdLineBannerView(
unit: adUnit,
alignment: .left
)
// 중앙 정렬 (기본값)
let lineBannerView = DaroAdLineBannerView(
unit: adUnit,
alignment: .center
)
// 우측 정렬
let lineBannerView = DaroAdLineBannerView(
unit: adUnit,
alignment: .right
)
```
#### 수동 초기 로드 설정
라인 배너 템플릿도 `autoLoad` 파라미터를 지원합니다:
```swift theme={null}
// 라인 배너 - 수동 초기 로드 모드
let lineBannerView = DaroAdLineBannerView(
unit: adUnit,
autoLoad: false // 자동 초기 로드 비활성화
)
// 원하는 시점에 초기 광고 로드
lineBannerView.loadAd()
```
```objc theme={null}
// 라인 배너 - 수동 초기 로드 모드
DaroObjCLineBannerView *lineBannerView = [[DaroObjCLineBannerView alloc]
initWithUnitId:nativeUnitId
autoLoad:NO]; // 자동 초기 로드 비활성화
// 원하는 시점에 초기 광고 로드
[lineBannerView loadAd];
```
템플릿을 사용하면 광고 뷰의 레이아웃을 직접 구현할 필요 없이, SDK에서 제공하는 기본 레이아웃을 사용할 수 있습니다. 필요한 경우 템플릿의 스타일을 커스터마이징할 수 있습니다.
#### 템플릿 설정
`DaroLineNativeAdConfiguration`을 통해 템플릿의 스타일을 커스터마이징할 수 있습니다
```swift theme={null}
let configuration = DaroLineNativeAdConfiguration()
configuration.backgroundColor = // 배경색
configuration.adMarkTextColor = // 광고 마크 텍스트 색상
configuration.adMarkBackgroundColor = // 광고 마크 배경색
configuration.titleTextColor = // 제목 텍스트 색상
configuration.ctaTextColor = // CTA 버튼 텍스트 색상
configuration.ctaBackgroundColor = // CTA 버튼 배경색
lineBannerView.configuration = configuration
```
메서드를 통해 템플릿의 스타일을 커스터마이징할 수 있습니다
```objc theme={null}
[lineBannerView setLineBackgroundColor:[UIColor systemBackgroundColor]];
[lineBannerView setAdMarkTextColor:[UIColor whiteColor]];
[lineBannerView setAdMarkBackgroundColor:[UIColor systemOrangeColor]];
[lineBannerView setTitleTextColor:[UIColor labelColor]];
[lineBannerView setCtaTextColor:[UIColor systemBlueColor]];
[lineBannerView setCtaBackgroundColor:[[UIColor systemBlueColor] colorWithAlphaComponent:0.1]];
```
```swift theme={null}
// 좌측 정렬
let lineBannerView = DaroAdLineBannerView(
unit: adUnit,
alignment: .left
)
// 중앙 정렬 (기본값)
let lineBannerView = DaroAdLineBannerView(
unit: adUnit,
alignment: .center
)
// 우측 정렬
let lineBannerView = DaroAdLineBannerView(
unit: adUnit,
alignment: .right
)
```
#### 수동 초기 로드 설정
라인 배너 템플릿도 `autoLoad` 파라미터를 지원합니다:
```swift theme={null}
// 라인 배너 - 수동 초기 로드 모드
let lineBannerView = DaroAdLineBannerView(
unit: adUnit,
autoLoad: false // 자동 초기 로드 비활성화
)
// 원하는 시점에 초기 광고 로드
lineBannerView.loadAd()
```
```objc theme={null}
// 라인 배너 - 수동 초기 로드 모드
DaroObjCLineBannerView *lineBannerView = [[DaroObjCLineBannerView alloc]
initWithUnitId:nativeUnitId
autoLoad:NO]; // 자동 초기 로드 비활성화
// 원하는 시점에 초기 광고 로드
[lineBannerView loadAd];
```
템플릿을 사용하면 광고 뷰의 레이아웃을 직접 구현할 필요 없이, SDK에서 제공하는 기본 레이아웃을 사용할 수 있습니다. 필요한 경우 템플릿의 스타일을 커스터마이징할 수 있습니다.
#### 템플릿 설정
`DaroLineNativeAdConfiguration`을 통해 템플릿의 스타일을 커스터마이징할 수 있습니다
```swift theme={null}
let configuration = DaroLineNativeAdConfiguration()
configuration.backgroundColor = // 배경색
configuration.adMarkTextColor = // 광고 마크 텍스트 색상
configuration.adMarkBackgroundColor = // 광고 마크 배경색
configuration.titleTextColor = // 제목 텍스트 색상
configuration.ctaTextColor = // CTA 버튼 텍스트 색상
configuration.ctaBackgroundColor = // CTA 버튼 배경색
lineBannerView.configuration = configuration
```
메서드를 통해 템플릿의 스타일을 커스터마이징할 수 있습니다
```objc theme={null}
[lineBannerView setLineBackgroundColor:[UIColor systemBackgroundColor]];
[lineBannerView setAdMarkTextColor:[UIColor whiteColor]];
[lineBannerView setAdMarkBackgroundColor:[UIColor systemOrangeColor]];
[lineBannerView setTitleTextColor:[UIColor labelColor]];
[lineBannerView setCtaTextColor:[UIColor systemBlueColor]];
[lineBannerView setCtaBackgroundColor:[[UIColor systemBlueColor] colorWithAlphaComponent:0.1]];
```