> ## Documentation Index
> Fetch the complete documentation index at: https://guide.daro.so/llms.txt
> Use this file to discover all available pages before exploring further.
# 네이티브 광고
> DARO를 통해 네이티브 광고를 구현하는 방법을 알아봅니다.
## 네이티브 광고 형태 소개
* 광고 뷰를 SDK가 자체적으로 구현해주는 타 광고 형태와 달리 네이티브 광고 형태는 구성 요소들을 전달받아 앱에서 직접 광고 뷰를 구현합니다.
* UI/UX 기반으로 레이아웃을 직접 구현하므로써 위화감을 적게 만들 수 있다는 것이 가장 큰 특징입니다. 단, 유저가 광고가 아닌 컨텐츠로써 착각하는 경우를 방지하기 위해 광고 표시와 함께 최소한의 차별성은 부여해야합니다.
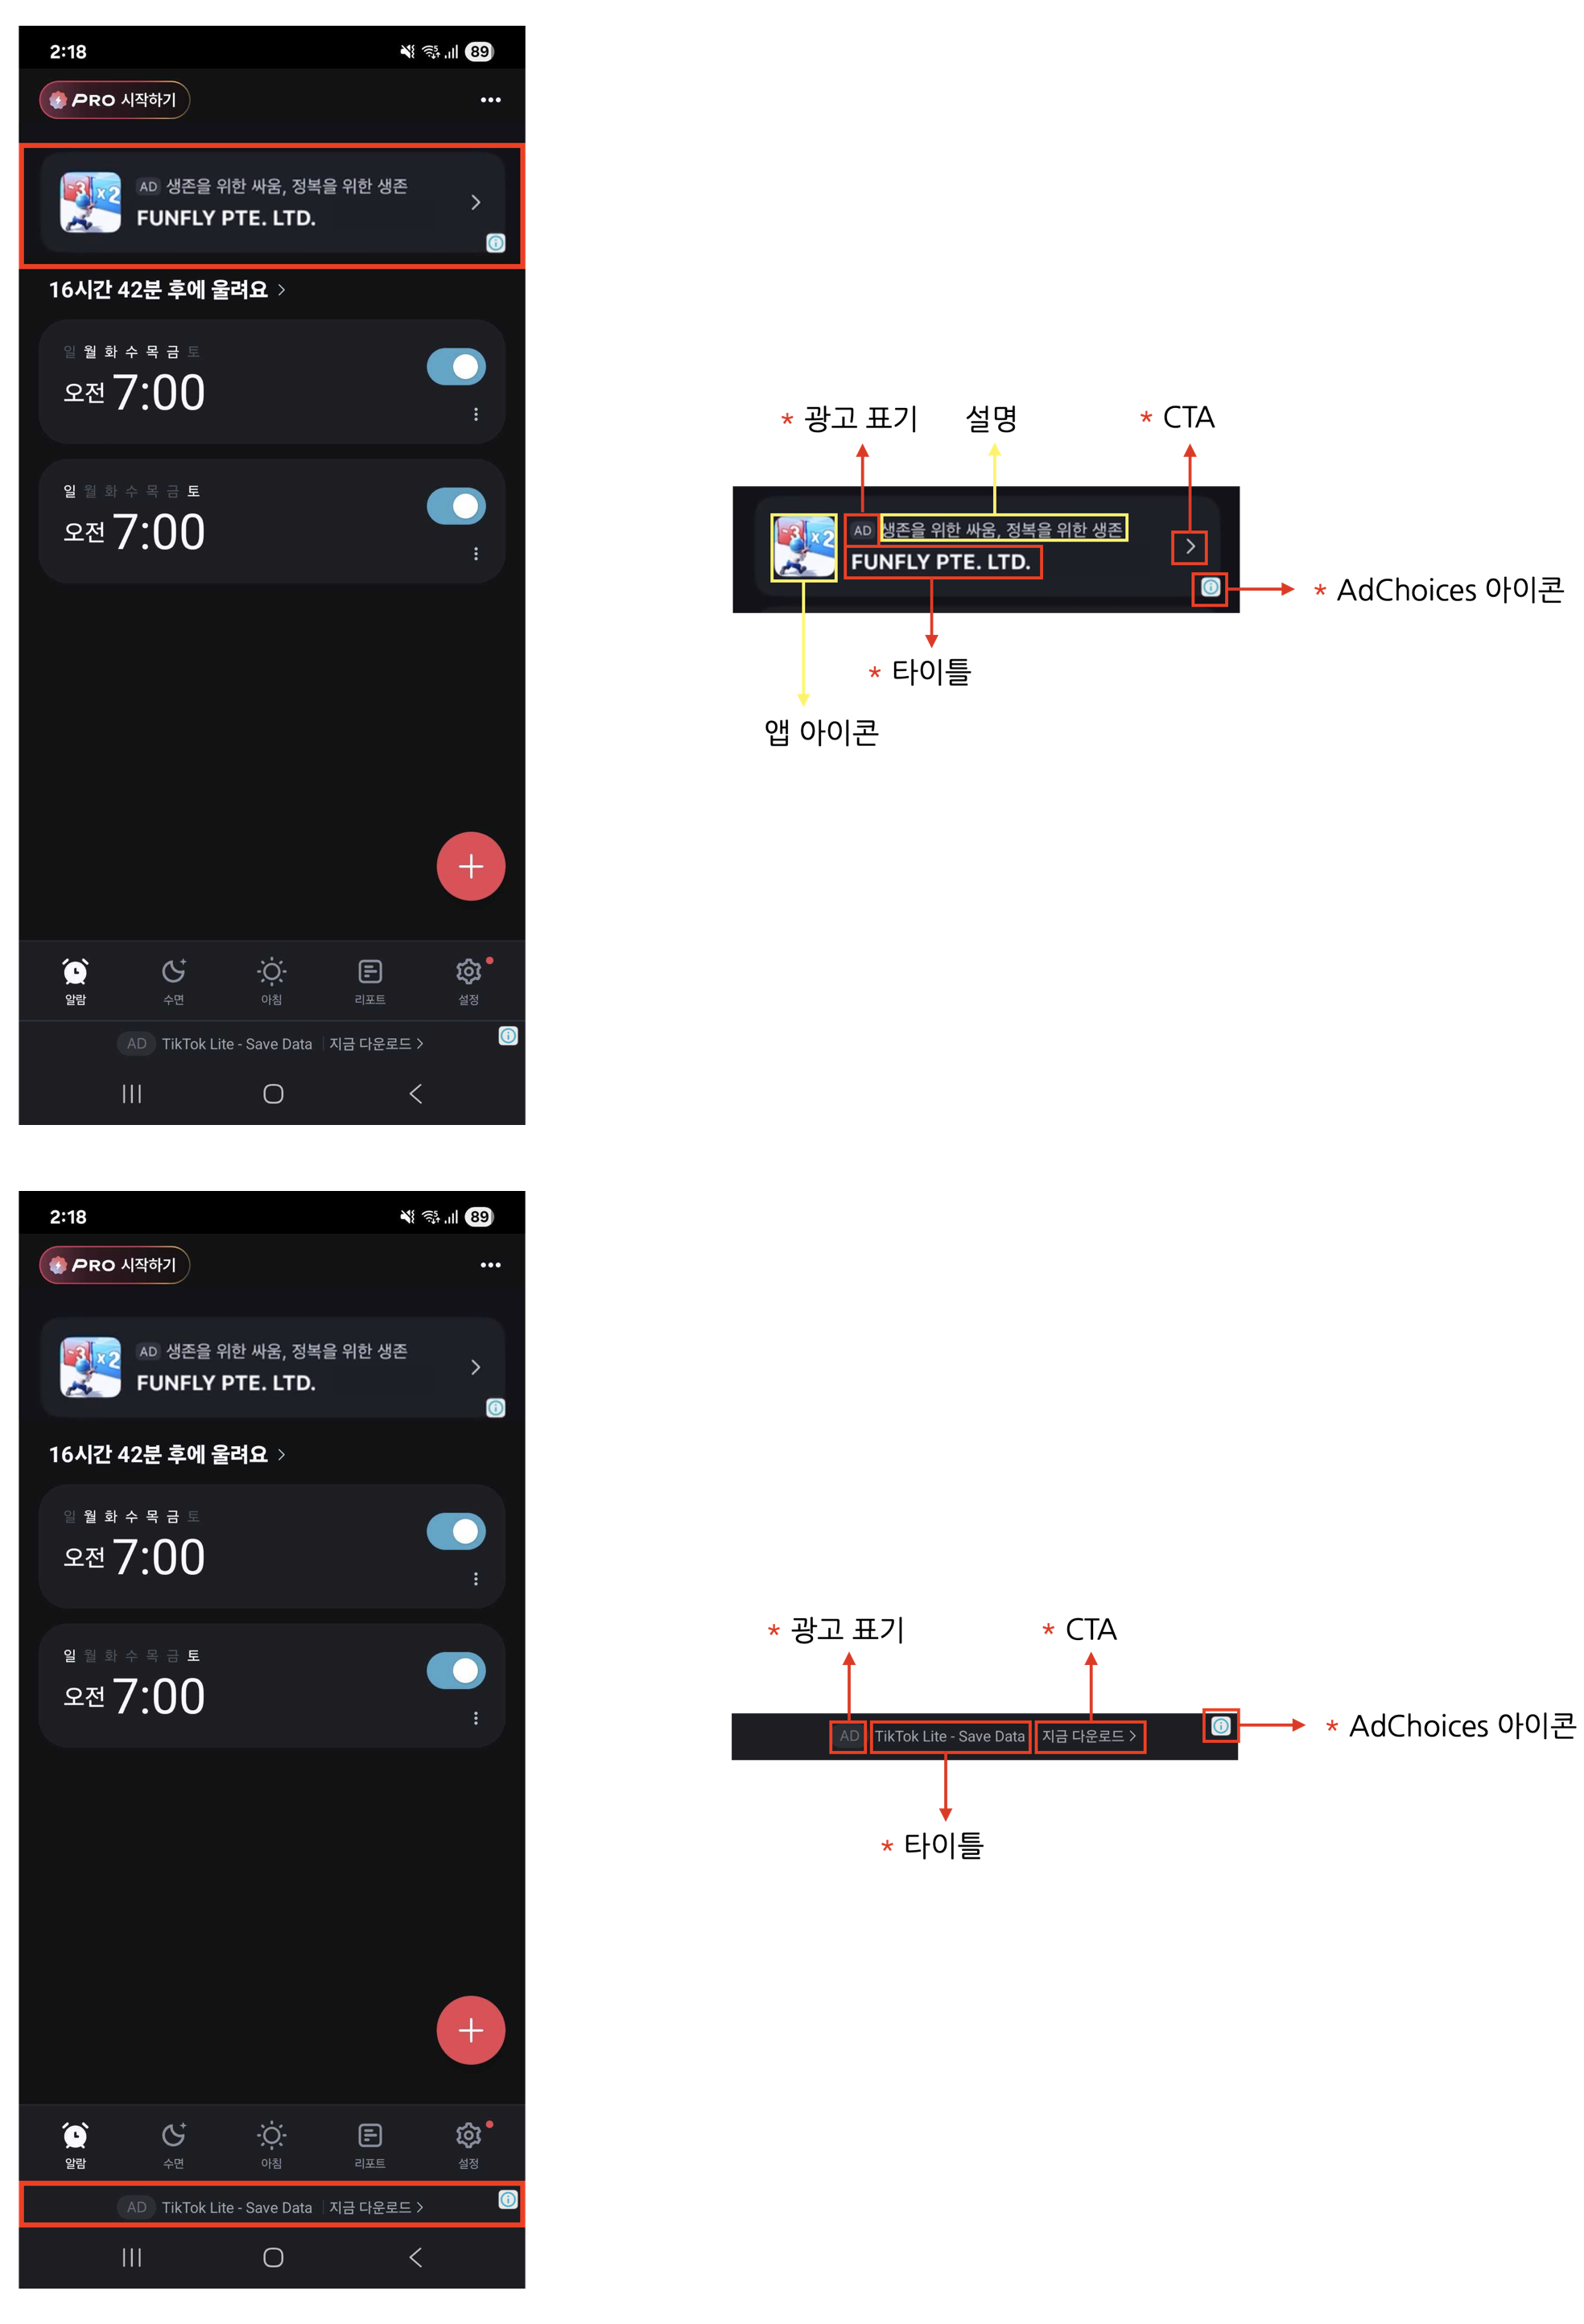 **네이티브 광고 필수 요소 4가지**
네이티브 광고는 앱 UI에 맞게 자유롭게 디자인할 수 있지만, 아래의 **4가지 필수 요소는 반드시 포함**해야 합니다. 이는 사용자가 광고임을 명확히 인지하도록 하고, 광고주가 기대하는 최소한의 광고 효과를 보장하기 위한 광고 정책입니다.
1. 광고 표기 : 사용자가 광고임을 명확히 인지할 수 있도록 광고 영역에 "AD", "광고" 등의 표기를 추가해 주세요.
2. AdChoices 아이콘 : AdChoices 아이콘은 사용자가 광고를 식별하고 제어할 수 있도록 제공되는 아이콘으로, 일반적으로 'ⓘ' 모양으로 표시됩니다. 해당 아이콘은 DARO SDK에서 자동으로 삽입되므로 별도 구현은 필요하지 않습니다. 광고 뷰의 4개 모서리(좌상단/우상단/우하단/좌하단) 중 한 곳에 배치되며, 기본 위치는 우하단입니다. Non-Reward 앱의 Manual Implementation(XML)에서는 `DaroNativeAdBinder.Builder.setAdChoicePlacement()`로 원하는 모서리를 선택할 수 있으니 (자세한 내용은 아래 [AdChoice 표시 위치](#adchoice-표시-위치) 섹션 참고), 해당 위치가 다른 UI 요소와 겹치거나 가려지지 않도록 광고 뷰를 구성해 주세요. 광고 소스(디맨드)에 따라 아이콘의 형태나 동작이 다를 수 있습니다.
3. 광고 제목 (타이틀) : 광고의 제목을 표시해야 합니다.
4. 클릭 유도 문안(CTA) : "설치", "열기", "다운로드" 등의 CTA(Call to Action) 버튼을 반드시 포함해 주세요. 버튼의 크기나 형태는 자유롭게 구성할 수 있으며, 상황에 따라 텍스트 필드로 대체 가능합니다. 광고 소스(디맨드)에서 CTA 문구를 제공하므로, 특정 문구를 고정할 필요는 없습니다.
***
## 광고 연동하기
* native 광고를 render하는데 필요한 adBinder를 생성합니다.
```kotlin xml theme={null}
val adBinder = DaroNativeAdBinder.Builder(context, ${layoutId})
.setIconViewId(${iconViewId})
.setBodyTextViewId(${bodyViewId})
.setCallToActionViewId(${callToActionViewId})
.setMediaViewGroupId(${mediaViewGroupId})
.setTitleViewId(${titleViewId})
.setAdChoicePlacement(DaroNativeAdChoicePlacement.BOTTOM_RIGHT) // optional, 기본값 BOTTOM_RIGHT
.build()
```
```kotlin programmatic theme={null}
val view = View()
val adBinder = DaroNativeAdBinder.Builder(view)
.setIconViewId(${iconViewId})
.setBodyTextViewId(${bodyViewId})
.setCallToActionViewId(${callToActionViewId})
.setMediaViewGroupId(${mediaViewGroupId})
.setTitleViewId(${titleViewId})
.build()
```
**네이티브 광고 필수 요소 4가지**
네이티브 광고는 앱 UI에 맞게 자유롭게 디자인할 수 있지만, 아래의 **4가지 필수 요소는 반드시 포함**해야 합니다. 이는 사용자가 광고임을 명확히 인지하도록 하고, 광고주가 기대하는 최소한의 광고 효과를 보장하기 위한 광고 정책입니다.
1. 광고 표기 : 사용자가 광고임을 명확히 인지할 수 있도록 광고 영역에 "AD", "광고" 등의 표기를 추가해 주세요.
2. AdChoices 아이콘 : AdChoices 아이콘은 사용자가 광고를 식별하고 제어할 수 있도록 제공되는 아이콘으로, 일반적으로 'ⓘ' 모양으로 표시됩니다. 해당 아이콘은 DARO SDK에서 자동으로 삽입되므로 별도 구현은 필요하지 않습니다. 광고 뷰의 4개 모서리(좌상단/우상단/우하단/좌하단) 중 한 곳에 배치되며, 기본 위치는 우하단입니다. Non-Reward 앱의 Manual Implementation(XML)에서는 `DaroNativeAdBinder.Builder.setAdChoicePlacement()`로 원하는 모서리를 선택할 수 있으니 (자세한 내용은 아래 [AdChoice 표시 위치](#adchoice-표시-위치) 섹션 참고), 해당 위치가 다른 UI 요소와 겹치거나 가려지지 않도록 광고 뷰를 구성해 주세요. 광고 소스(디맨드)에 따라 아이콘의 형태나 동작이 다를 수 있습니다.
3. 광고 제목 (타이틀) : 광고의 제목을 표시해야 합니다.
4. 클릭 유도 문안(CTA) : "설치", "열기", "다운로드" 등의 CTA(Call to Action) 버튼을 반드시 포함해 주세요. 버튼의 크기나 형태는 자유롭게 구성할 수 있으며, 상황에 따라 텍스트 필드로 대체 가능합니다. 광고 소스(디맨드)에서 CTA 문구를 제공하므로, 특정 문구를 고정할 필요는 없습니다.
***
## 광고 연동하기
* native 광고를 render하는데 필요한 adBinder를 생성합니다.
```kotlin xml theme={null}
val adBinder = DaroNativeAdBinder.Builder(context, ${layoutId})
.setIconViewId(${iconViewId})
.setBodyTextViewId(${bodyViewId})
.setCallToActionViewId(${callToActionViewId})
.setMediaViewGroupId(${mediaViewGroupId})
.setTitleViewId(${titleViewId})
.setAdChoicePlacement(DaroNativeAdChoicePlacement.BOTTOM_RIGHT) // optional, 기본값 BOTTOM_RIGHT
.build()
```
```kotlin programmatic theme={null}
val view = View()
val adBinder = DaroNativeAdBinder.Builder(view)
.setIconViewId(${iconViewId})
.setBodyTextViewId(${bodyViewId})
.setCallToActionViewId(${callToActionViewId})
.setMediaViewGroupId(${mediaViewGroupId})
.setTitleViewId(${titleViewId})
.build()
```
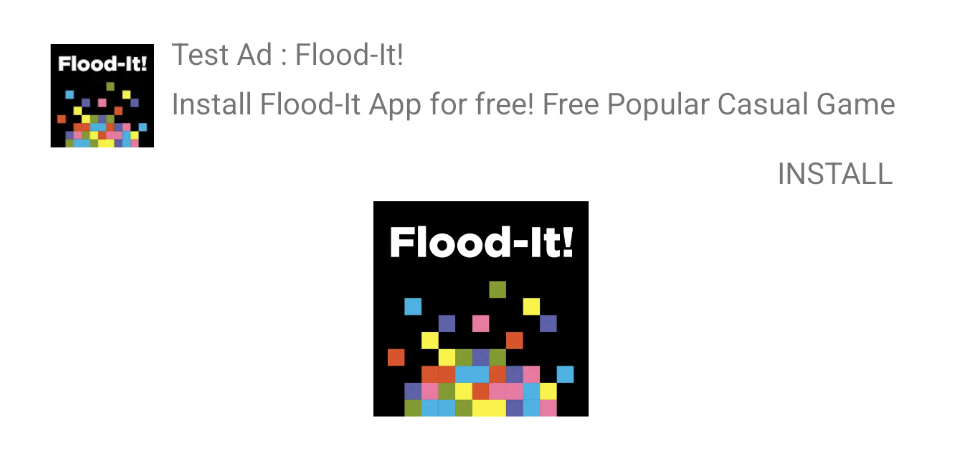 ```xml layout_native.xml expandable theme={null}
```
```kotlin MainActivity.kt theme={null}
val adBinder = DaroNativeAdBinder.Builder(this, droom.daro.m.R.layout.layout_native)
.setIconViewId(droom.daro.m.R.id.view_icon)
.setBodyTextViewId(droom.daro.m.R.id.view_body)
.setCallToActionViewId(droom.daro.m.R.id.button_cta)
.setMediaViewGroupId(droom.daro.m.R.id.view_media)
.setTitleViewId(droom.daro.m.R.id.view_title)
.build()
```
```kotlin theme={null}
val adBinder = DaroNativeAdBinder.fromTemplate(
context,
DaroNativeAdTemplate.Banner(
...
)
)
```
```kotlin theme={null}
val adUnit = DaroNativeAdUnit(
key = ${AdUnitId},
placement = ${placement}, //로그 상 보여질 이름입니다. 공백을 보내도 무관합니다.
)
```
```kotlin theme={null}
val adView = DaroNativeAdView(
context = context,
adUnit = adUnit
)
binding.adViewContainer.addView(adView)
```
```kotlin theme={null}
adView.setAdBinder(adBinder)
```
```kotlin theme={null}
adView.setListener(object : DaroAdViewListener {
override fun onAdImpression(adInfo: DaroAdInfo) {}
override fun onAdClicked(adInfo: DaroAdInfo) {}
override fun onAdLoadSuccess(ad: DaroViewAd, adInfo: DaroAdInfo) {}
override fun onAdLoadFail(err: DaroAdLoadError) {}
})
```
```kotlin theme={null}
adView.loadAd()
```
`loadAd()` 호출 전에 반드시 `adBinder`를 설정해야 합니다.
* 뷰를 선언하면 자체적으로 화면에 맞는 라이프사이클을 찾아 동작을 관리합니다. 따로 `resume`, `pause`, `destroy`를 호출하지 않아도 됩니다.
* `autoDetectLifecycle` 값을 false(default: true)로 설정하는 경우, `resume`, `pause`, `destroy`를 직접 호출해주셔야 합니다.
```kotlin Manual implementation(Compose) theme={null}
DaroNative(
adUnit = DaroNativeAdUnit(
key = ${AdUnitId},
placement = ${placement}
),
listener = object : DaroAdViewListener {
override fun onAdImpression(adInfo: DaroAdInfo) {}
override fun onAdClicked(adInfo: DaroAdInfo) {}
override fun onAdLoadSuccess(ad: DaroViewAd, adInfo: DaroAdInfo) {}
override fun onAdLoadFail(err: DaroAdLoadError) {}
},
modifier = Modifier
) {
DaroNativeAdTitle { title -> Text(title) } // for title
DaroNativeAdBody { body -> Text(body) } // for body
DaroNativeCallToAction { callToAction -> Text(callToAction) } // for callToAction
DaroNativeIcon(modifier = Modifier.size(40.dp)) // for ImageView
DaroNativeMedia(modifier = Modifier.size(100.dp)) // for MedaiView
}
```
```kotlin Use Template theme={null}
DaroNative(
adUnit = DaroNativeAdUnit(
key = ${AdUnitId},
placement = ${placement}
),
modifier = Modifier,
listener = object : DaroAdViewListener {
override fun onAdImpression(adInfo: DaroAdInfo) {}
override fun onAdClicked(adInfo: DaroAdInfo) {}
override fun onAdLoadSuccess(ad: DaroViewAd, adInfo: DaroAdInfo) {}
override fun onAdLoadFail(err: DaroAdLoadError) {}
},
template = DaroNativeAdTemplate.Line(
...
)
)
```
`DaroNativeAdView.requestPreload()` 메서드를 통해서 광고 뷰를 생성하지 않고도 광고를 미리 로드할 수 있습니다.
```kotlin theme={null}
DaroNativeAdView.requestPreload(
this,
DaroNativeAdUnit(
key = ${AdUnitId},
placement = ${placement},
)
)
```
이 때, 뷰에 사용하는 DaroNativeAdUnit의 `AdUnitId`, `placement` 모두 일치해야 미리 로드한 광고를 바로 사용할 수 있습니다.
***
## AdChoice 표시 위치
* `DaroNativeAdBinder.Builder.setAdChoicePlacement()`로 AdChoice 아이콘 위치를 지정할 수 있습니다.
* 기본값으로 우하단(`BOTTOM_RIGHT`) 이 사용됩니다.
* 지원 값: `TOP_LEFT`, `TOP_RIGHT`, `BOTTOM_LEFT`, `BOTTOM_RIGHT`.
이 옵션은 Non-Reward 앱의 Manual Implementation(XML) 에서만 제공되며, Template 및 Reward 앱은 기본값으로 고정됩니다.
Reward 앱에서는 `setAdChoicePlacement()`를 호출하더라도 실제 AdChoice 위치는 변경되지 않습니다.
**디맨드별 동작 차이 (선호 위치, 보장 아님)**
`setAdChoicePlacement()` 는 "이 위치에 AdChoices 아이콘을 넣어달라"고 디맨드에 요청하는 값입니다. 하지만 실제로 어디에 표시되는지는 각 디맨드가 결정하기 때문에 요청한 위치가 반드시 반영되지는 않습니다.
디맨드마다 반응이 다를 수 있습니다.
* 요청한 위치 그대로 반영하는 디맨드
* 요청을 무시하고 자체적으로 고정된 위치에 표시하는 디맨드
* AdChoices 아이콘 대신 자체 광고 표시(예: 광고 마크) 로 대체하는 디맨드
어느 경우든 광고 관련 컴플라이언스 요건은 충족됩니다.
따라서 광고 레이아웃을 디자인할 때는 **네 모서리 어디에든 AdChoices/광고 마크가 표시될 수 있다**고 가정하고, 각 모서리에 충분한 여백을 확보해두는 것을 권장합니다.
***
## Template
* Daro SDK에서는 다음과 같은 template을 제공합니다.
```xml layout_native.xml expandable theme={null}
```
```kotlin MainActivity.kt theme={null}
val adBinder = DaroNativeAdBinder.Builder(this, droom.daro.m.R.layout.layout_native)
.setIconViewId(droom.daro.m.R.id.view_icon)
.setBodyTextViewId(droom.daro.m.R.id.view_body)
.setCallToActionViewId(droom.daro.m.R.id.button_cta)
.setMediaViewGroupId(droom.daro.m.R.id.view_media)
.setTitleViewId(droom.daro.m.R.id.view_title)
.build()
```
```kotlin theme={null}
val adBinder = DaroNativeAdBinder.fromTemplate(
context,
DaroNativeAdTemplate.Banner(
...
)
)
```
```kotlin theme={null}
val adUnit = DaroNativeAdUnit(
key = ${AdUnitId},
placement = ${placement}, //로그 상 보여질 이름입니다. 공백을 보내도 무관합니다.
)
```
```kotlin theme={null}
val adView = DaroNativeAdView(
context = context,
adUnit = adUnit
)
binding.adViewContainer.addView(adView)
```
```kotlin theme={null}
adView.setAdBinder(adBinder)
```
```kotlin theme={null}
adView.setListener(object : DaroAdViewListener {
override fun onAdImpression(adInfo: DaroAdInfo) {}
override fun onAdClicked(adInfo: DaroAdInfo) {}
override fun onAdLoadSuccess(ad: DaroViewAd, adInfo: DaroAdInfo) {}
override fun onAdLoadFail(err: DaroAdLoadError) {}
})
```
```kotlin theme={null}
adView.loadAd()
```
`loadAd()` 호출 전에 반드시 `adBinder`를 설정해야 합니다.
* 뷰를 선언하면 자체적으로 화면에 맞는 라이프사이클을 찾아 동작을 관리합니다. 따로 `resume`, `pause`, `destroy`를 호출하지 않아도 됩니다.
* `autoDetectLifecycle` 값을 false(default: true)로 설정하는 경우, `resume`, `pause`, `destroy`를 직접 호출해주셔야 합니다.
```kotlin Manual implementation(Compose) theme={null}
DaroNative(
adUnit = DaroNativeAdUnit(
key = ${AdUnitId},
placement = ${placement}
),
listener = object : DaroAdViewListener {
override fun onAdImpression(adInfo: DaroAdInfo) {}
override fun onAdClicked(adInfo: DaroAdInfo) {}
override fun onAdLoadSuccess(ad: DaroViewAd, adInfo: DaroAdInfo) {}
override fun onAdLoadFail(err: DaroAdLoadError) {}
},
modifier = Modifier
) {
DaroNativeAdTitle { title -> Text(title) } // for title
DaroNativeAdBody { body -> Text(body) } // for body
DaroNativeCallToAction { callToAction -> Text(callToAction) } // for callToAction
DaroNativeIcon(modifier = Modifier.size(40.dp)) // for ImageView
DaroNativeMedia(modifier = Modifier.size(100.dp)) // for MedaiView
}
```
```kotlin Use Template theme={null}
DaroNative(
adUnit = DaroNativeAdUnit(
key = ${AdUnitId},
placement = ${placement}
),
modifier = Modifier,
listener = object : DaroAdViewListener {
override fun onAdImpression(adInfo: DaroAdInfo) {}
override fun onAdClicked(adInfo: DaroAdInfo) {}
override fun onAdLoadSuccess(ad: DaroViewAd, adInfo: DaroAdInfo) {}
override fun onAdLoadFail(err: DaroAdLoadError) {}
},
template = DaroNativeAdTemplate.Line(
...
)
)
```
`DaroNativeAdView.requestPreload()` 메서드를 통해서 광고 뷰를 생성하지 않고도 광고를 미리 로드할 수 있습니다.
```kotlin theme={null}
DaroNativeAdView.requestPreload(
this,
DaroNativeAdUnit(
key = ${AdUnitId},
placement = ${placement},
)
)
```
이 때, 뷰에 사용하는 DaroNativeAdUnit의 `AdUnitId`, `placement` 모두 일치해야 미리 로드한 광고를 바로 사용할 수 있습니다.
***
## AdChoice 표시 위치
* `DaroNativeAdBinder.Builder.setAdChoicePlacement()`로 AdChoice 아이콘 위치를 지정할 수 있습니다.
* 기본값으로 우하단(`BOTTOM_RIGHT`) 이 사용됩니다.
* 지원 값: `TOP_LEFT`, `TOP_RIGHT`, `BOTTOM_LEFT`, `BOTTOM_RIGHT`.
이 옵션은 Non-Reward 앱의 Manual Implementation(XML) 에서만 제공되며, Template 및 Reward 앱은 기본값으로 고정됩니다.
Reward 앱에서는 `setAdChoicePlacement()`를 호출하더라도 실제 AdChoice 위치는 변경되지 않습니다.
**디맨드별 동작 차이 (선호 위치, 보장 아님)**
`setAdChoicePlacement()` 는 "이 위치에 AdChoices 아이콘을 넣어달라"고 디맨드에 요청하는 값입니다. 하지만 실제로 어디에 표시되는지는 각 디맨드가 결정하기 때문에 요청한 위치가 반드시 반영되지는 않습니다.
디맨드마다 반응이 다를 수 있습니다.
* 요청한 위치 그대로 반영하는 디맨드
* 요청을 무시하고 자체적으로 고정된 위치에 표시하는 디맨드
* AdChoices 아이콘 대신 자체 광고 표시(예: 광고 마크) 로 대체하는 디맨드
어느 경우든 광고 관련 컴플라이언스 요건은 충족됩니다.
따라서 광고 레이아웃을 디자인할 때는 **네 모서리 어디에든 AdChoices/광고 마크가 표시될 수 있다**고 가정하고, 각 모서리에 충분한 여백을 확보해두는 것을 권장합니다.
***
## Template
* Daro SDK에서는 다음과 같은 template을 제공합니다.
 전체 배경색
콘텐츠 텍스트 색상
광고 마크 배경색
광고 마크 텍스트 색상
전체 배경색
콘텐츠 텍스트 색상
광고 마크 배경색
광고 마크 텍스트 색상
 전체 배경색
콘텐츠 텍스트 색상
광고 마크 배경색
광고 마크 텍스트 색상
전체 배경색
콘텐츠 텍스트 색상
광고 마크 배경색
광고 마크 텍스트 색상
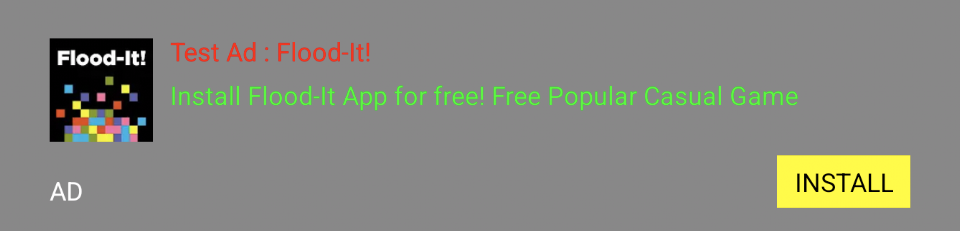 전체 배경색
타이틀 텍스트 색상
설명 텍스트 색상
CTA(버튼) 배경색
CTA(버튼) 텍스트 색상
하단 광고 마크 텍스트 색상
전체 배경색
타이틀 텍스트 색상
설명 텍스트 색상
CTA(버튼) 배경색
CTA(버튼) 텍스트 색상
하단 광고 마크 텍스트 색상